While not required to run a great Dungeons & Dragons game, great handouts can really draw players into the story of the game. They give the game a tactile feel. They show the players what the world looks like. When made well, they give players an artifact that looks like the thing their character would see. That's a whole other level of immersion into this wonderful game of ours.
Handouts are also a great way to frame the game and steer its direction. It's a way to reinforce the important points of the game to the players, remind them of important NPCs, and show them how their actions can affect the world.
There are many different types of handouts. Today we'll talk about three of them. Artwork, maps, and letters. We'll also talk about the best way to construct such handouts and how we might do so with relative ease and lower cost.
Image may be NSFW. Clik here to view.
A Big List of Handout-Suitable Ideas
Here's a list of the types of things for which you may want to make a handout. You can read through this list while thinking about your game to figure out which handouts might make sense.
NPC artwork
Location artwork
Puzzle or trap artwork
Monster artwork
Magic item artwork
Geographic maps
Dungeon or building maps
Encounter maps
Handbills
Petitions
Legal documents
Secret codes and cyphers
Hit orders
Notes between secret lovers
Mad ravings
Desperate calls for help
Job board postings
Letters from family members to characters
Letters from bosses to henchmen or vice versa
Journal entries
Shopping lists
Evil villain to-do lists
Treasure maps
Secret plans
This Twitter thread had many wonderful suggestions on the types of handouts one can make and how to make them.
Image may be NSFW. Clik here to view.
Artwork
There are many overused metaphors for the importance of great artwork. "Show don't tell" and "a picture is worth a thousand words" leap easily to mind. There's truth to these metaphors. If we're visual people, seeing a picture of a person, place, or thing will have a bigger impact than a simple verbal description. When possible we can show art to our players of the things their characters might see. Maybe it's a monster, maybe it's a location, maybe it's an NPC, maybe it's a magic item. Whatever it is, they'll be more likely to place it and remember it if they can see it.
Making a legal physical handout of art is tricky. In the US, it's illegal to print and display a piece of art without permission. You can search for Creative Commons artwork that gives you more permissions to print yourself.
You can also save artwork to a digital photo album and use an iPad or a TV screen if you happen to have one in your gaming room to show artwork to your players during a game.
If you don't have access to a color printer, you can put together a PDF of the images you want and send them to your local Fedex print center. You can print two nice big pieces of color art for about a buck a page, a little more if you want nicer paper quality. With two to four pieces of art per page you can slice them up with a paper cutter and have some excellent art handouts for your players.
For monster art, my friend Joe at Inkwell Ideas sells a bunch of decks of monster cards with statistics on one side and artwork on the other. These cards not only help you keep track of which monster you might use in a game but can also give you a piece of artwork to show your players when the monster hits the table.
Image may be NSFW. Clik here to view.
Maps
Maps of all sizes; whether it's regional maps, dungeon maps, or encounter maps; can draw your players into the world. Like Bilbo Baggins planning his journey back to Rivendell, maps capture and recapture the imagination. They take ethereal worlds and make them real. Even better are maps your players can draw on. Good maps of Chult and Omu for Tomb of Annihilation sold by Mike Schley run about $2 for a digital version and can then be printed on 11x17 paper at Fedex for about $3. A big regional map can be used for an entire campaign. Each location the characters discover can be marked on the map. At the end of the campaign you'll have a nice artifact of the journey you and your players took through the lands of Chult.
Dyson Logos, a true hero in this hobby, offers a huge amount of royalty-free maps you can print and use in your game. They print well on normal black and white printers or you can have them printed in larger formats at your print shop of choice. For larger dungeons, they're hard to beat.
Black and white line-art maps print very well at Staples or Fedex using theirblueprint printing services. This was nearly ten times cheaper than printing full-color maps. The Staples blueprint printing service can produce an 18x24 map for under two bucks and a 24x36 map for under four. You may be tempted to print 36x48 inch maps but they're really too big to be useful. Stick to no larger than 24x36. Using this service I was able to print every map from Ghosts of Saltmarsh for under $40.
Letters and In-World Handouts
In-world handouts can include any sort of letters, pictures, diagrams, codes, or anything else that anyone in-world might have written down on a piece of paper.
Letters are likely the most common. Letters might be secret notes sent between villains or cyphers kept by crazy old wizards. They might be notes secretly sent by sadistic vampire lords to trap adventurers in their realm of shadow.
One great way to make handouts is to use parchment resume paper and write notes using strange fonts. You can dig through your own selection of fonts or download some relevant fantasy fonts from dafont.com.
Print your notes on the resume paper, tear off the edges, and crumple them up a bit and you have a wonderful in-world note for not a lot of effort or money. Throw some red paint on there and you have the last note of the Burgomeister's agent clutched in the poor fellow's wolf-torn hand.
If you don't want to drop the money for special paper you can print on normal paper, tear the edges, and soak it in tea or coffee to give it a rustic feel.
Instead of writing your own handouts, you can find excellent handouts published by others in the DM's Guild. Creators on the guild have published handbills, notice boards, legal documents, treasure maps, and more for many published D&D adventures. These may not have the same value as a customized handout built for your own campaign but their production value may make up for it.
Handouts As Game Prep
Beyond building a nice tactile prop to help draw your players into the game, making handouts helps you get a better grasp on what's happening in the world. Letters between villains and henchmen can tell you what a villain is thinking and what they're doing in the world. Journals can help you keep important plot points down. Secret messages and maps reinforce the important places in the world. Building handouts helps you reinforce the main beats in your campaign for both you and your players.
Drawing Your Players into the World
Building handouts as part of game prep is often overlooked yet it provides a tremendous value in bringing a whole new physical sense into our game. It's one thing to read a letter aloud or describe the contents of a journal and something else entirely to hold a letter written by Strahd von Zarovich himself in your own hands. While not a critical component of game prep, when we have the time, building great handouts can take our game to a new dimension.
When I began putting together Sly Flourish's Fantastic Adventures, I had a model for what I wanted to do already in hand. Monte Cook Games had recently released Weird Discoveries, a book of ten short adventures for their awesome science fantasy roleplaying game, Numenera. Weird Discoveries fit very well within the philosophy behind the Lazy Dungeon Master as a book of adventures designed from the ground up to be easy to prepare and easy to run. I wanted the exact same thing for Dungeons & Dragons so I wrote and released Fantastic Adventures to do exactly that and, this year, wrote Ruins of the Grendleroot to do the same thing.
As part of the latest release of Numenera, Monte Cook Games released Explorer's Keys, a book very similar to Weird Discoveries. It's another book of of ten adventures built from the ground up to be easy to prepare and easy to run. In particular, Explorer's Keys has one design technique to solve a difficult problem in published adventures; how to control their timing and pacing: keys.
Image may be NSFW. Clik here to view.
In this article we're going to dig into this design technique and see how we can incorporate it into our own D&D games.
Keys, the Physical Objective of an Adventure
Keys, in this context, are physical things tied to the overall objective of an adventure. The key is the thing you need to accomplish the adventure's goals, or one of its goals. A key can be just about any physical object. It might be an idol the characters are sent to acquire. It might be an ancient forbidden tome they must acquire. It might be a demilich's dormant skull. It might be an actual key required to get through a door. It might also be the door itself.
Keys aren't bound to unthinking objects either. A key might be a boss villain that must be put into the ground. It might be a child that must be rescued. Keys might even be information. A secret or clue could be a key required to move on in an adventure or campaign. The secret location of the ancient blue dragon sorcerer, Iymrith, might be a key.
One factor defines keys in this context: they're required to accomplish an adventure. Sometimes only one key is required. Sometimes a few are needed. The characters have to acquire the key or keys to complete the quest.
Example Keys
Here's a list of twenty potential keys we might find in any given adventure.
A vast black door barring entry to the realm of the Night Serpent.
A soul coin containing the tormented soul of a long-dead sage.
A strange map with directions to reach the isle at the center of the Endless Nadir.
A map with a safe route through the deadly underdark.
The code word required to enter the hideout of the Weeping Blade assassins' guild.
The spell that can crack the great seal and release a trapped planetar.
The last cult fanatic of Bhaal who knows the secret of the Death Curse.
The four clues to the identity of the head of the Scarlet Brotherhood in Saltmarsh.
The location of the Vault of Dragons.
The evidence that proves one of the council members of Saltmarsh was once a slave trader.
The portal key to enter the Doom Vaults.
The three weapons hidden away in White Plume Mountain.
The sword that can destroy the devil Strahd.
The Book of the Worm buried beneath the unholy cathedral.
The word that can quiet the Grendleroot.
The demonic assassin sent to kill the last follower of the Gray Prince.
The ring of three wishes that can undo the tyranny of the queen of dragons.
The gateway of the Red Wizards hidden beneath Dragonspear Castle.
The evidence of the king's broken lineage.
The dagger that can pierce the archmage's spell of invulnerability.
Keys can Move
It's one thing to clearly define keys in an adventure but that isn't a big change from how adventures work. One trick to the keys in Explorer's Keys is that they can move. Like secrets and clues, we need not define exactly where any given key is in an adventure. We can put these keys where they best serve the adventure we're running at the time. Being able to move keys around means we can tune an adventure for the time we have and change its pace if things get slow and boring. I sometimes refer to this as the "moving MacGuffin".
Obviously the location of some keys will matter. The ark of the covenant can really only be in the well of souls. The well of souls, however, might be anywhere. The well of souls itself is a key.
One great example of movable keys are the artifacts in Curse of Strahd. In the adventure itself, tarokka cards are drawn that define where these artifacts lay. Just like in the original i6 Ravenloft, the location of these artifacts defines the adventure. One problem with this design is that you can't change the location of the item once the card is drawn. If the characters are having a hell of a time getting up into the highest tower to recover the Tome of Strahd, you can't suddenly decide it's in the dining room to save everyone some time and energy.
An Example of Movable Adventure Keys: The Book of the Worm
Let's look at an example of how movable adventure keys can fit into an adventure. I'm going to lift this one right out of the short story Jursalem's Lot by Stephen King.
One of the characters has inherited an old dilapidated mansion far outside of town. Shortly before arriving at the home, the characters are attacked by cultists of the White Crow, a strange and forgotten cult that once resided in the area. They shouted "the worm must be eaten" before trying to stab the characters to death. If interrogated, they tell the characters that the character inheriting the home is a descendant of a priest who resided in the nearby town of Blackbristle. The town was overtaken by the wilds centuries ago and no one knows exactly where it once stood. On arriving at the house, the characters are accosted by specters and worm-filled zombies. In their exploration of the house, they learn that the character is indeed cursed by their ancestral line and must burn the Book of the Worm, lost in the Blackbristle temple, if they want the curse to be broken.
Thus, we have two keys for this adventure: the location of Blackbristle and the Book of the Worm.
We could have three or four locations for this adventure, each with a number of smaller locations, rooms or chambers. The mansion itself could be one big location, the forest surrounding Blackbristle might be another. The town might be its own location. The temple of Blackbristle and the dungeon beneath might be a fourth. This can give us quite a big adventure if we want. Maybe twelve to sixteen hours worth if we fill it all out. Or we can compact things and run it in three.
It all depends on where we put the keys.
If we want to run this adventure in a couple of hours, we might move the book out of the temple completely and put it in the cellar beneath the mansion. If we want to stretch things out, the location of Blackbristle might take quite an investigation to find with all sorts of twisted ruins and lairs in the forest blocking the way. Maybe the Book of the Worm is on the lectern in the temple's nave. Maybe it's five levels down in the rat-infested sub-cellars beneath the temple. Our movable key lets us tune the adventure however we want and however it best fits the time we have to run the game.
A Fundamental Structure to an Adventure
Keys are fundamental components of our D&D adventures. When the characters go off on a quest, they're changing the world somehow. They must find something. They must recover something. They must destroy something. Keys are the objects, people, monsters, or pieces of information they must find, recover, or destroy. Some keys may be as small as a glyphed jewel. Others may be entire lost planes of existence floating in the astral sea. Identifying our keys and understanding how we can move them gives us a powerful dial to make our D&D adventures as exciting as they can be.
Warning: This article contains spoilers for Ghosts of Saltmarsh and Danger at Dunwater.
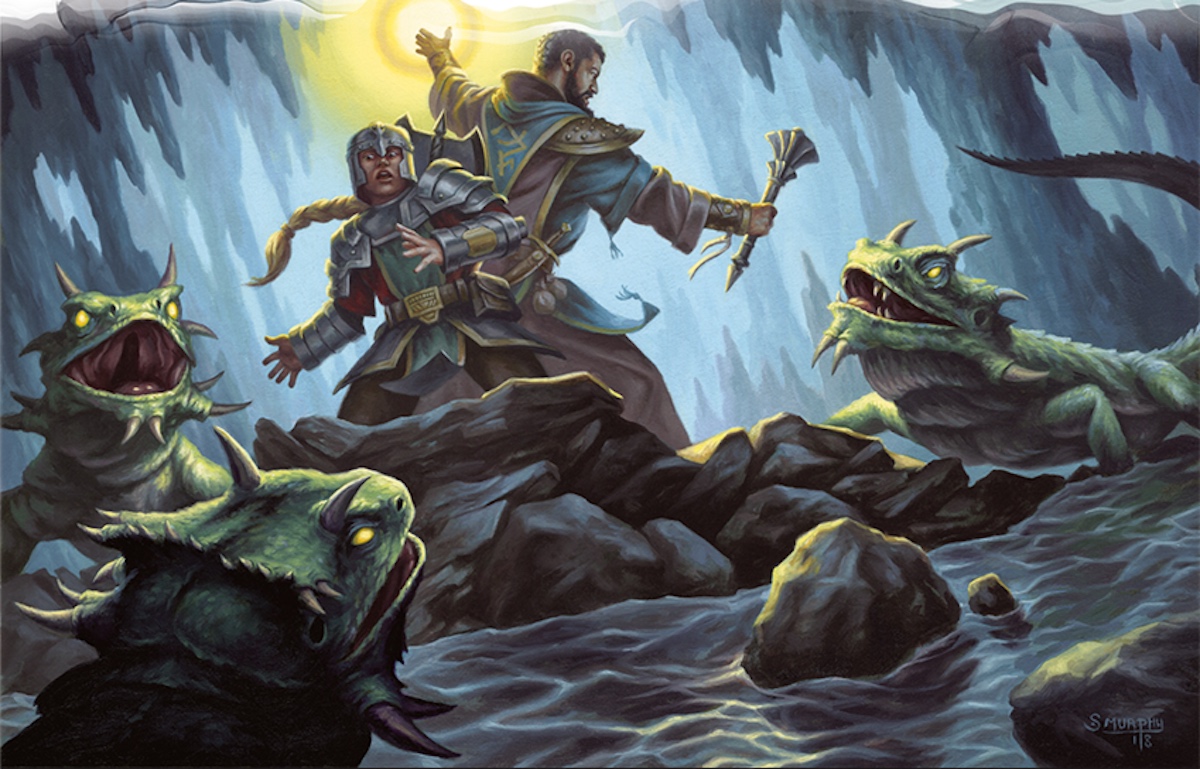
Danger at Dunwater, an adventure originally written in 1982 and the second adventure in Ghosts of Saltmarsh, is an interesting case study in adventure design. The adventure hangs on a particular approach in order to work well. In this approach, the characters should go in unsure of the threat the Dunwater lizardfolk pose to the town of Saltmarsh and, throughout the adventure, they should learn that the lizardfolk not only don't pose a threat to Saltmarsh but are mobilizing against an enemy that does threaten the fisher village: the sahuagin. The characters should be on their guard as this adventure begins, but not go in swords drawn and murder a bunch of innocent lizardfolk. That's a thin line.
Image may be NSFW. Clik here to view.
Steering Towards Non-Violence
There's an interesting range of attitudes the characters might hold as they approach this adventure:
They could assume the lizardfolk are peaceful.
They can be unsure of the lizardfolk.
They can assume the lizardfolk are hostile.
If they are in the third category, this adventure might end up going poorly quickly. If they go in hot, they stand the chance of getting invested in combat. If they've cut down one lizardfolk or five or ten, they're likely to continue even if they start to get evidence that things might not be as they seem. It can be a bummer for the players if they realize they've killed a bunch of creatures that could have been allies.
It's ideal if the characters go into the situation unsure of the lizardfolks' intent and with a desire to learn more about this intent before they're willing to draw blades and throw spells. This keeps the tension high and still allows for the big reveal; that the lizardfolk are actually arming against the sahuagin, not Saltmarsh.
If keeping that tension becomes too difficult, it's better to steer the characters towards the assumption that the lizard folk are not hostile. This removes the tension from the adventure but it's better than the characters murdering half of the lizardfolk only to realize they have it all wrong when they're standing on a stack of bodies.
We can control this approach by determining what clues we drop in front of the characters ahead of time. Here are a few secrets and clues the characters can discover that helps steer them the right way:
The lizardfolk are arming themselves using stolen weapons from the kingdom of Keoland.
Lizardfolk are not typically raiders or invaders. They stay in their own territory and are largely isolationist.
It is not unheard of for lizardfolk to trade with other humanoid races.
Saltmarsh has seen no lizardfolk scouts scouting out the town.
The lizardfolk of Dunwater haven't always been there. They arrived there as refugees from somewhere else.
Ships from the west report of being attacked by "sea devils" who are likely not lizardfolk.
Some of these secrets might feel heavy-handed and go against the goal of running this adventure with a clear tension. As we listen to the conversations of the players, though, we can gauge whether they think of the lizardfolk as a hostile force to attack on sight or something worth investigating deeper. If they're leaning towards hostility, we might drop in one or more of these clues to help steer them the other way.
Ignoring Fifty Two Rooms
Depending on how this adventure goes, we may end up ignoring the 52 room descriptions in this adventure. Similar to Village of Hommlet, we have a lot of descriptions of places that really only reward murder hobos. Any group that tries to negotiate with the lizardfolk aren't likely to go room by room looking under mattresses for jeweled conch shells. It's possible we'll need those room descriptions if one or two characters go sneaking around. They're also handy given that the characters can approach the promontory from three different entrances. The rooms, map, and description are written like a dungeon crawl, however, but if it ends up running like one, something has likely gone wrong.
The Situation at the Promontory
Like we did with much of Sinister Secret of Saltmarsh we'll run the promontory as one big situation. We have a lot of lizardfolk (I didn't count but it feels like fifty) conducting their daily activities. The queen is meeting with ambassadors from other aquatic races so at any given time she may be in her throne room receiving the koalinth or locathah. Depending on what the characters do, the lizardfolk could show up in force or they could be quite confused and run about the lair trying to figure out what is going on. Again, if things go poorly and it turns into a bloodbath, this adventure has gone the wrong way. This is something to watch out for early.
Handling Murder-Hobos
This adventure won't go well if your players are "stab first, ask questions later" sorts of folks. This adventure is designed so the characters will discover that the threat they assumed they had, the lizardfolk, are actually not the threat at all.
It is possible this whole adventure goes down this road and maybe that's ok. It will likely dawn on the players that they maybe shouldn't have killed all of those lizardfolk in the first place. That doesn't sound like a very fun run of this adventure to me but maybe it works out.
The adventure includes some mechanics for determining how the lizardfolk queen deals with the characters should murder occur. I'm not a fan of these mechanics and think it's easier if we DMs wing it based on how the situation looks to us and how we think the lizardfolk might react. If some lizardfolk died fighting the characters before negotiations have started, you may decide how that gets sorted out. Perhaps, as Merric Blackman offers, the lizardfolk demand monetary restitution to the clan for each lizardfolk lost in battle.
If your group are a bunch of murder hobos, maybe one of the councilmembers approaches the characters before they leave and tells them that its more important that they find out what is going on before they jump right into hostility. It's a bit heavy handed but sometimes we need to be heavy handed to help steer an adventure towards the most fun.
Players are Unlikely to Surrender
It's important to note that players very rarely surrender in D&D. It's one thing to see a big monster that you know is beyond you and slowly step away. It's something else to be surrounded by an overwhelming force and drop your weapons. Player characters don't drop their weapons. They have little guarantee that they'll get them back and players hate losing their stuff. There's also no guarantee that they'll be left alive or have to suffer through some pain-in-the-ass escape scenario.
Thus, whatever you expect your players to do in this adventure, don't expect them to surrender to the lizardfolk. That's one of the very unlikely results. It's far more likely they'll either have a stressful negotiation or it will turn into a bloodbath. We want to aim for the former. This should be first and foremost on our minds when we run this adventure.
Queen Othokent's Quests
This wouldn't be much of an adventure if the characters simply figured out that the lizardfolk aren't hostile and helped form an alliance between the lizardfolk and Saltmarsh against the sahuagain—the real threat.
Instead, to prove themselves to the lizardfolk, Queen Othokent offers the characters two quests they can complete for her to show their loyalty:
Kill Thousand-Teeth the crocodile.
Retrieve the queen's helm from the bullywugs.
This gives our characters a pair of more traditional adventure hooks to make up for not cleaning out the lizardfolk lair room by room.
The Thousand-Teeth adventure can run much as it does in the book. See "Epilogue: Croc Hunt" for the details.
For the bullywug encounter, we can go beyond what's in the adventure.
Image may be NSFW. Clik here to view.
Expanding the Bullywug Encounter
The beginning of Danger at Dunwater includes a potential encounter with a bullywug king and some of his followers. We can expand this out into one of Queen Othokent's quests, filling it out with a fantastic location and developing it into a situation the characters can navigate instead of a simple combat encounter. In my own running of this game, I chose an old Suloise ruin with a huge statue of a Suloise hero before both the Suloise and Baklunish nearly killed each other off roughly a thousand years ago.
In this expanded encounter, King Gulpa'Gor, his pet giant toad Bipsy, and about a dozen bullywugs are watching two bullywugs duel one another. The duel consists of great displays of insult and boasting with nary a blow passing between them beyond, perhaps, a great fart. This is a good opportunity to read up on bullywugs in the Monster Manual and note they are all about projecting an image of superiority without actually wanting to get involved in a fight. Good fun for potential roleplaying in this encounter.
King Gulpa'Gor has carefully stashed the helm of underwater action in the belly of Bipsy who can regurgitate it on command.
How the characters choose to deal with this situation is up to them. They can sneak in, perform some sort of ruse, or go in swords drawn. Such a situation has lots of opportunity for exploration, roleplaying, and combat.
Queen Othokent has requested that the characters recover the helm, an artifact of the lizardfolk stolen from them by the bullywugs. On their success, she gifts the helm to them as a sign of their commitment to the alliance between the Dunwater lizardfolk and Saltmarsh.
The Malenti Assassin
There's a wonderful bit of lore hiding in the description of sahuagins in the Monster Manual. Some rare sahuagins appear indistinguishable from sea elves. These alienated sahuagin, known as malenti, make the perfect spies and assassins. In Danger at Dunwater one of these malenti might have infiltrated the lizardfolk lair appearing as an ambassador of the sea elves. While the lizardfolk have not allied with the sea elves, it is possible they would harbor a sea elf ambassador regardless. This sea elf, however, is actually looking for the opportune moment to strike; first by releasing any captured sahuagin and then by attempting to murder Queen Othokent.
When the characters return from their croc hunt and bullywug heist, they might return to the queen for a celebration and an evening of rest. That evening, however, the malenti releases a number of sahuagin imprisoned by the lizardfolk and then makes for the queen's bedroom. The characters are awakened by the sound of combat and follow a trail of dead lizardfolk to the queen's lair where they see the malenti, a spy, crouched over the dying body of the queen. The characters must defeat the malenti and sahuagin and save the queen.
This is a fun little encounter that shows the sahuagin as more than an abstract threat and gives an opportunity for a tighter bond between the queen and the characters. The queen, after being saved, rewards the characters with the very helm they acquired for her from the bullywugs.
A Return to Saltmarsh
With the queen now open to an alliance, the characters can return to Saltmarsh and inform the council of the sahuagin threat. Perhaps it's another good opportunity for a downtime session in which the characters seek out their own quests and goals before being recruited for the next adventure in the book, Salvage Operation.
No level is more dangerous in Dungeons & Dragons than 1st level. With their low hit points, it isn't uncommon for a 1st level character to go from full hit points to zero in one or two successful hits. Stories of 1st level characters falling to the critical hit of a swarm of rats are commonplace. Given the low hit point threshold of 1st level characters, death due to massive damage is much more likely at 1st level than any other level in D&D.
Image may be NSFW. Clik here to view.
"Dragon Slayers And Proud Of It" by Larry Elmore.
This threat doesn't continue as characters gain levels. The hit points of 2nd level characters increase by more than 50%. A 3rd level character has twice the hit points of a 1st level character. Not only does it require twice as much damage to send a 3rd level character to zero but it takes four times as much damage to kill them with massive damage. That's a much bigger safety margin.
With more hit points, better spells, and more character options available, the threat facing higher level characters is not nearly as deadly as it is at 1st level.
A group of 16th level characters facing two hezrou demons and a balor is not nearly as threatening as four 1st level characters facing a single ogre.
The Entry Point of D&D
It also doesn't help that brand new players to D&D nearly always start with 1st level characters. With limited options available, learning how to play D&D is easier at 1st level than it is at higher levels.
It's unfortunate that it's also the the most dangerous level to play.
Some hard-nosed veteran D&D commentators might state this this is how the game is meant to be. D&D is about the threat of death, they might say. We each have our opinions and this is not one I share. I think D&D is about sharing tales of high adventure. While the risk of death is important, it need not be so much more prevalent at 1st level during someone's first exposure to D&D. I also argue that this threat does not maintain pace as characters level up. Higher level monsters are not nearly the same threat to high level characters as low level monsters are to 1st level characters.
There are some easy fixes to this problem. Starting characters off with five or ten more hit points would make a huge difference and not affect much of the rest of the game in higher levels. Removing death due to massive damage is another option. Characters will still drop when they hit zero hit points but they won't be instantly killed by a rare critical hit.
If we prefer not to house-rule our way out of the dangers at 1st level, we can take more care on the DM's side of things and pay particular attention to the combat encounters we design for 1st level characters.
1st Level Combat Encounter Rules-of-Thumb
When designing any combat encounter in D&D at any level, we must consider a few variables. You can read more about this in A New DM's Guide For Building Combat Encounters. The variables we note when creating a combat encounter include the following:
What is the story of the encounter?
What monsters make sense for that story?
How many monsters are there?
What challenge rating are the monsters?
Whatever combat encounter you're designing for 1st level characters, you still need a story and that story will still dictate the types and quantity of monsters the characters might face. Sometimes this story may be "there are giant rats in my cellar" (a Teos Abadia favorite...) or "there are giant constrictor snakes in the well outside of the haunted mansion" (from Ghosts of Saltmarsh. Simple stories for new adventurers.
The next two questions require particular care when designing combat encounters for 1st level characters. Here are some basic rules of thumb to help us design combat encounters for 1st level characters.
Include fewer monsters than characters. If there are more monsters than characters, regardless of their challenge rating, the battle will be very hard for 1st level characters. In general, choose fewer monsters than characters at 1st level.
Include monsters of challenge rating of 1/4 or less. Even a challenge 1/2 thug is a serious problem for 1st level characters. Two of them can be deadly given their multiple attacks and pack tactics. Stick to monsters less than challenge 1/4 for encounters against 1st level characters.
Keep average monster damage to 5 or less. Some CR 1/4 monsters like giant centipedes, swarms of insects, and flying snakes do a fair bit of extra damage. Like higher challenge monsters, they might kill a 1st level character outright if things go badly. Watch the average damage of your monsters and keep it to around 4 or 5.
You might think limiting yourself to monsters of CR 1/4 or less would be burdensome but over seventy such monsters exist in the Monster Manual alone. With some reskinning, changing out armor, changing weapons, and otherwise altering the flavor of these monsters, there is really no limit at all.
In Lost Mine of Phandelver the characters face Klarg, a bugbear. Klarg hits like a Tarrasque when facing 1st level characters. If he gets a surprise attack, he hits for 18 points. That's probably enough to kill a wizard with a single hit. If he critically hits? Make that 34. That will kill any 1st level character, maybe even 2nd level character, in a single hit.
I'd argue the battle against Klarg is harder than the battle against Strahd or Iymrith or even Tiamat given the power of 1st level characters when compared to the power of Klarg. Keep that in mind when running low level adventures.
Cast "Aid"
One trick that doesn't require any houseruling is to have a benevolent priest cast aid on the characters before their first adventure. Maybe this is a friend of one of the characters. Maybe this is their quest NPC. Maybe they're not so benevolent after all and will call upon the characters for a service in exchange.
This need not be an NPC either. Maybe one of the characters has a single-use Relic that casts aid on all of the characters once. Maybe this relic activates as soon as the game begins.
Aid gives each character a bonus of 5 hit points to their cap and to their current hit points for eight hours. That's a good boost for 1st level characters and doesn't require any houseruling.
Level Quickly
I often quip that 1st level adventures should be limited to a stern conversation and a fight with a giant rat. 1st level adventures need not be long affairs. When characters reach 2nd level, they become much more robust. We don't need to be nearly as careful at 2nd level and above. Thus, its always worth while to get characters to 2nd level after four hours or less of game time.
Consider leveling characters to 2nd level quickly; maybe even after the first combat in an adventure.
Paying Special Attention to the Beginning of D&D
When we think about a player's first experience playing D&D, we want it to be a fun and positive experience. Getting killed by a pack of six wolves in the first scene in the game isn't much fun. We DMs have a lot of flexibility when designing combat encounters throughout our D&D games but 1st level games require their own special attention. Use fewer monsters than characters, keep them at CR 1/4 or less, watch their damage, and let the players enjoy their first game of D&D.
Dungeon crawls are a staple in Dungeons & Dragons games. Ever since the game's creation characters have traversed forgotten hallways accosted by beasts never touched by the sun. Even as D&D's focus has shifted for many of us from tactical combat to a more story-focused game, dungeon crawls still remain a common adventure theme.
And sometimes they can be a drag.
Almost by definition dungeon crawls press the characters. Throughout their crawl, the characters face monsters, traps, and hazards in the darkness of the tunnels. There's not a lot of joy in the forbidden depths and that lack of joy can drain not just the characters of their resources but the fun out of the players.
Image may be NSFW. Clik here to view.
Beats and Hamlet's Hit Points
"Stories engage our attention by constantly modulating our emotional responses."
The above quote comes from Hamlet's Hit Points by Robin Laws. In this book, Robin talks about hopeful and fearful beats of roleplaying games, in the context of upward and downward beats in movies. Too many downward beats and a story can feel depressing and hopeless. People give up and their immersion breaks. Too many upward beats and things get boring and stale. The excitement wears off. Hamlet's Hit Points also offers definitions of the types of story beats including procedural, dramatic, commentary, anticipation, gratification, bringdown, pipe, question, and reveal. For this article, we're going to worry less about beat types and focus on beat resolution; how the beats feel to the players.
Oftentimes we don't have to worry about beats too much. We need not keep the model in mind because our game naturally hits the right mix hopeful and fearful beats as we run it. As we become more experienced game masters, we naturally fall into a pattern of storytelling that resonates well with our players.
Sometimes, though, the nature and direction of our game pushes us into an area where one type of beat resolution might be far more common than another, pushing us into the domains of hopelessness or boredom.
For example, if the characters travel to a peaceful and well-guarded town with few threats, they might enjoy shopping and meeting powerful people. They might enjoy their downtime, for a while at least. But without a threat, without a challenge, their time in the town can get boring. Waterdeep, the jewel of the north, still has a vast dungeon beneath it and a whole city full of smugglers, thieves, and assassins in a vast cave right near by. Conspiracies abound. Residing in peaceful towns is only interesting for so long. We love James Bond movies when he travels to exotic locations but the movie would be pretty boring if the whole movie consisted of Bond traveling by gondola between casinos like Anthony Bourdain in Parts Unknown.
The Inherent Fearful Beat of the Dungeon Crawl
Dungeon crawls are the opposite. Unlike safe and clean cities, dungeons are full of constant and continual danger. They are filled with terrible monsters, vicious traps, and deadly hazards. They are not nice places to visit and yet they are a common theme in many of our D&D games. Because of this, remembering the importance of adding hopeful beats to offset the many inherent fearful beats of a dungeon can be critical to the fun of the session.
Not All Players Have the Same Beats
Its important to note that beats are a blunt tool for a complicated situation. We might have a table where, for whatever reason, one player has had a series of bad rolls (down beats) while everyone else is doing fine. The same can go the other way; one player is having a great time while everyone else feels like they're being dragged through hell. Though not all players feel the same beats the same way, we can generally keep an eye on the beats of the overall adventure and how its affecting the players.
Twenty Hopeful Dungeon Beats
The following is a list of twenty hopeful dungeon beats we might drop into our game if our dungeon is becoming too hopeless. You can read through these or roll 1d20 to get some ideas for your own dungeon-based hopeful beats.
A healing font that restores the characters to full health
A lost magic weapon
A friendly ghost who gives useful information
A torn tapestry revealing a useful secret or clue
A trap that can be used against enemies
A hidden treasure vault
A secret passage that bypasses a hazard
A hidden room offering safety for a short or long rest
A map revealing a piece or the whole of the dungeon
An amulet that lets the characters bypass a trap, hazard, or group of monsters
An useful ambush point
A friendly or turncoat monster
A statue that casts a one-hour bless on the characters
A group of low-powered monsters easily blasted by the wizard's fireball
A hazard that can be turned against a group of enemies
High ground that offers an advantageous position
A powerful monster convinced to become an ally
Downward Beats to Keep an Eye On
As constructs inherently designed for downward beats, some common themes emerge in dungeons that amplify the dungeon's fear, leading potentially into hopelessness, frustration, and eventually disengagement from our players. Here are some common downward-beat themes we should be aware of.
Too many hard battles. Our drive to bring a challenge to our characters can result in us dropping too many hard battles against the characters with little chance for a break. Sometimes battles with multiple waves bring great excitement and challenge. Too many in a row, though, can make players feel drained and bored instead of challenged and excited. Instead, throw in some easy encounters where the characters' power can shine.
Too many of the same type of monster. Getting attacked by a group of specters can feel dangerous and exciting as they phase through the walls and attack. Spreading out these specters into three or four scenes of hit-and-run ambushes can become a frustrating drag. In general, avoid encounters that look a lot like ones already faced. Add something new and interesting into each encounter so they don't all feel the same. Likewise, avoid using the same type of monster continually. Facing battle after battle with specters, shadows, ghosts, and bodaks can make players feel like they're just getting their hit points drained over and over. Mix in other monster types that still fit the theme of the story.
Too long without a rest. Limiting opportunities for short and long rests is a well-known and highly-recommended technique to ensure DMs can challenge characters, particularly at high levels. This can go too far. As we watch the characters' resources get drained in a dungeon, we need to be conscious of their current status as the challenges continue. The longer the characters go without a rest, the more fearful their players become. This is ok as long as we're aware of it and able to off-set it with upward beats. When possible and where it makes sense, an opportunity for a short or long rest can be its own powerful upward beat. Perhaps a host of specters has prevented the characters from resting in the dungeon until the necrotic sphere in the dungeon's center was destroyed. Now the specters have vanished and the characters can take a safe rest.
Boring environments. The walls of the dungeon tell a story. Murals, carvings, statues, corpses, torn pages from a journal; all of these details can tell the story of the dungeon. Strange decorations, huge statues in high-vaulted chambers, great rifts that fall into bottomless depths, gruesome altars; all of these details can change the environment and steer us away from endless stone walls, narrow passages, and 30-foot-square rooms. Add details and fantastic elements to catch the imagination of the players and show them the uniqueness of the area they explore.
No new information. Traveling from hallway to hallway, from room to room, fighting monsters and learning nothing can get boring and stale fast. Each room, hallway, challenge, and monster offers a new opportunity to learn something. They might learn the history of the dungeon. They might learn why it was built the way it was. They might learn a secret few know about. They might learn about their villain. Use every scene as an opportunity to reveal a piece of the story of the world.
No clear goal. "Why are we doing again?" Because of their dangerous nature, its important that the characters know why they are facing the dangers they face within a dungeon. Without a clear goal progress is unknown. Hopelessness and frustration soon follow. Keeping the goal clear and showing progress towards that goal gives the characters, and the players, something to hang onto while they face the deadly challenges of the dungeon.
No warning. If the players don't realize they're going to be headed into a resource-draining dungeon with few opportunities to rest, they can become frustrated quickly when it dawns upon them; often after they've spent a good deal of resources early on. Warning them of the coming trials can help them prepare and sets them up psychologically for the challenge they will face. Sometimes this can be a warning from a friendly NPC or information gleaned from an old explorer's notes. Other times we might warn them of something their characters would recognize that the players may not. "Seeing the threats in this dungeon, you do not think you'll able to rest safely for some time." When the players are prepared for the challenge, they can keep some of their hopelessness and frustration in check. It was, after all, expected.
Constant combat. Combat is likely the most common challenge in Dungeons & Dragons and it's easy to overuse it. Filling a dungeon with battle after battle can get stale fast. Just because our dungeon is an ancient vault untouched for centuries doesn't mean we can't fill it up with exploration and roleplaying as much as any other scene. Roleplaying can come from ghosts, other explorers, turncoat monsters, divine entities, or intelligent items. Exploration can bathe the walls of the dungeon, revealing all kinds of secrets and clues. We need to keep our drive to fill a dungeon with monsters in check by ensuring the characters have just as much opportunity to explore the dungeon and interact with its denizens as they are fighting foes.
Watching the Beats
Dungeons, by their nature, break away from our natural storytelling instincts to modulate emotional beats. The inherent danger and hopelessness of a dungeon pushes downward beats easily and requires extra effort on our part to offset them with suitable upward beats that make sense within the context of the story. While we all have fond memories of D&D's most popular dungeons such as the Tomb of Horrors, Castle Ravenloft, the Temple of Elemental Evil, and the Tomb of the Nine Gods we might also remember the frustration and hopelessness that drives players to think less about how their characters survive such challenges and more about how mechanical design screwed them over.
Bathe your dungeons in stories and lore, drop in interesting NPCs, and let the characters discover a hidden vault with a forgotten fountain of rejuvenating water. Watch the downward beats, drop in upward beats, and turn your dungeon crawl into an exciting tale fondly remembered.
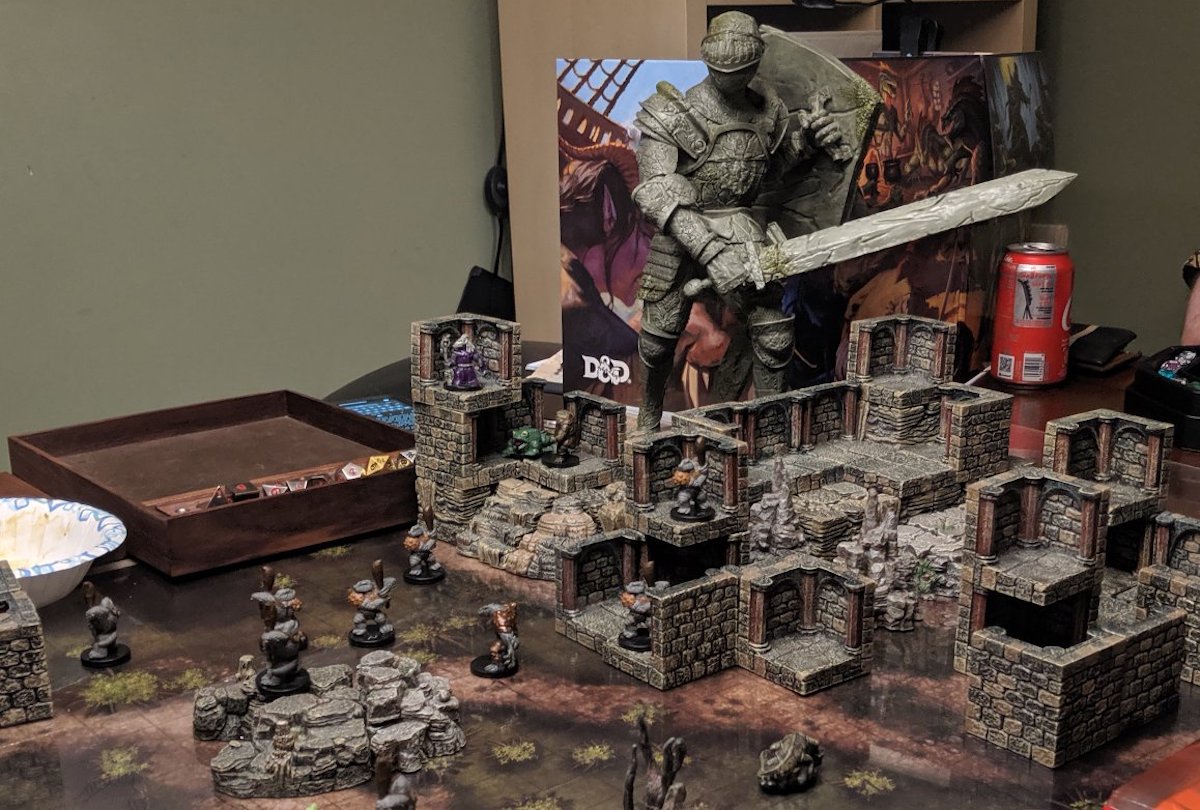
While some are quite happy designing their own maps from scratch to run in their D&D games, us lazy dungeon masters are much happier stealing maps wherever we can. The maps in Lazy DM's Workbook are designed specifically around this goal. These maps are built around the most common dungeons in D&D including the crypt, castle, dungeon, caves, sewers, temple, mines, cellars, docks, and wizards tower. These are all common staples in our fantasy RPGs. If those ten maps don't get us what we need, we can always hit up the map archive of Dyson Logos which has more than 750 maps we can choose from.
These maps alone, however, may not fit the intention we have for the dungeon in our game. What if we steal a dungeon with fifteen rooms but only need three? What if the dungeons in our game span different environments? How can we build an entirely new map without starting from scratch?
Let's say we want to run a small temple with a small catacombs beneath it. We have the above maps (drawn by Elven Tower), of course, but these might be too big for us.
Just like mixing a few traits from different monsters can make an entirely new monster (hello vampire!), we can take a few rooms from our temple map and a few rooms from our catacombs map and build something entirely new. We might, for example, only use 1, 2, 9, 10, and 11 from our cacacombs map and rooms 1, 2, 3, 4, 5, 6, and 9 from our temple map. We might add in hallways that connect rooms 2 to 5. The big pit in room 7 of the temple map might lead to the giant skull in room 9. Now that's an interesting connection!
Starting With the Rooms We Need
When we prepare for our game and go through the eight steps from Return of the Lazy Dungeon Master, step 5 has us identifying fantastic locations. Typically we need only one such location for every 45 minutes of gameplay. For a single-session four-hour adventure we might need six to eight such locations. We can start by looking at the maps we are thinking of using, selecting the rooms that fit the story, and cutting out the rest. Instead we can start with our locations and then look for generally appropriate maps to connect them together. Often one map alone won't be perfectly suited but two maps cut up and smashed together can suit the job perfectly.
Doing It All In Your Head
Some DMs might be tempted to sit down with some sort of computer program and redesign the maps, actually cutting and pasting rooms together into a new physical map. That's likely not necessary. Sometimes we can just write down the list of rooms and know, in our heads, that the others aren't accessible.
Many times we DMs build out our adventures as though someone else is going to rum them. We add flavor text; we draw beautifully designed maps; we write up large random-encounter lists; we carefully document dozens of story threads, hooks, and plot seeds. It's unlikely anyone else will ever see these notes, however. They're just for us. Thus, our notes can be much briefer than we might expect from a published work because it's all in our head already. We don't need carefully written read-aloud text; we just need a couple of words to remind us what's in a chamber so we can describe it to our players when the game comes around.
The same is true for maps. Some might want to spend an hours drawing a beautiful Dyson-quality maps but sometimes a stick figure is all we need to know how a bunch of rooms are connected. Some square blocks and interconnecting lines are all we really need to run such a location.
When we're smashing together a couple of existing maps, knowing which parts we're going to use, how the maps are going to connect, and which parts of them we're going to throw away is just about everything we need to run a great game.
Warning: This article contains spoilers for Ghosts of Saltmarsh.
Chapter 4 of Ghosts of Saltmarsh, Salvage Operation, is the first chapter that isn't part of the actual Saltmarsh series of adventures beginning with The Sinister Secret of Saltmarsh, and Danger at Dunwater. It's the first adventure that doesn't actually connect to the town of Saltmarsh or the threat of the sahuagin. On the surface, this makes it a more difficult adventure to incorporate into the larger Saltmarsh storyline, assuming you have one. It is, however, an extremely flexible adventure that we can easily use to reinforce the story of Saltmarsh rather than sail away from the story.
Today we're going to talk about modifying Salvage Operation so it can better reinforce the stories we're already exploring in our Saltmarsh campaign.
Image may be NSFW. Clik here to view.
The Adventure Structure of Salvage Operation
Salvage Operation is a refreshingly simple adventure. The characters learn that a ship thought sunk called the Emperor of the Waves is actually still afloat. They're asked to go to the ship and recover a lockbox containing something valuable (one wonderful bit of flexibility). Aboard they find that the ship has actually been taken over by a cult (another bit of flexibility) and is soon under attack by a huge sea horror (a third bit of flexibility). The characters must get on the ship, get the lock box, and escape the ship before being killed by the sea monster. It's a great simple adventure ripe for a lot of modifications to help support our own campaigns.
The Brotherhood's Plot
If we're running Ghosts of Saltmarsh as a larger campaign, we may have included the Scarlet Brotherhood as a secret villain. They're busy figuring out how to take over the Saltmarrsh council, member by member, so they can control Saltmarsh from the shadows. The Brotherhood isn't afraid to kill, kidnap, extort, or bribe their way in as long as they have control.
This mission to recover the lockbox is a great way to reinforce the Brotherhood's plot.
When they return from negotiating with the lizardfolk in Danger at Dunwater, the council will need some time to reach out to the lizardfolk and deliberate about their response. This is a great time for the characters to engage in some downtime. During this downtime, their friend, Anders Solmor, may come to them with urgent business and a request. It would seem, Anders describes, that someone on the council has a secret to hide. Associates of Anders (associates that once worked with his parents who are now both dead) told him that evidence of this secret are stored in a lockbox aboard the Emperor of the Waves. Everyone believed the ship had sunk years ago but apparently it did not. Anders's associates know where the ship might be and, being a mission of some delicacy, Anders trusts the characters to make their way out to the ship and recover the lockbox.
The Cult of the Chained God and the Scarlet Brotherhood
Behind the scenes, a high-ranking member of the Cult of the Chained God, Mr. Dory, is also a member of the Scarlet Brotherhood. Through his connection to Tharizdun, he found the Emperor of the Waves in a dimensional storm near the Endless Nadir. All of this comes from the Chapter 8 adventure The Styes, including Mr. Dory, the Endless Nadir, and the Cult of the Chained God. We're foreshadowing some of that adventure while running this one.
Mr. Dory passed his information on the Emperor of the Waves and its secret to Skerrin Wavechaser, the ranking member of the Scarlet Brotherhood in Saltmarsh who passes the information to Anders Solmor. Anders gives it to the characters.
What secret is within the lockbox? We can change it to whatever suits our needs to move the Scarlet Brotherhood plot forward. In my own game it was evidence that the Emperor of the Waves was a slaving vessel that did business with Eda Oweland. The evidence would have her removed from the council and likely hanged. Earlier, it is possible that Skerran's ruse with Gellen Primewater had him removed from the council as well. That reduces the council from five to three. A kidnapping in the Kingdom of Keoland of Eliander Fireborn's daughter puts the majority of the remaining three councilors in the hands of the Scarlet Brotherhood.
The Flexible Cult
As written, Salvage Operation includes a cult to Lolth but we can just as easily change this cult to the Chained God and tie it closer to the adventure The Styes. The Cult of the Chained God can become another front in our overall Saltmarsh campaign, one that can move forward as the characters engage in the adventures.
We may want to change some of the creatures in Salvage Operation with creatures closer to the aberrations we might see in service of Tharizdun. We might reskin the swarms of spiders, the giant spiders, and the ettercaps into pirate abomination hybrids formed and twisted by Tharizdun's corruption on the island where they landed. Among the papers found in the lockbox might be a journal of their landing on an island and the discovery of a fifty-foot-high obsidian obelisk over a million years old marked with the sign of Tharizdun. This would be an island directly above the huge rift leading to the Endless Nadir.
The Flexible Villain
Krell, the main villain in Salvage Operation, is easily reskinned as well. In my own game, I wanted to give him a connection to one of the characters so I changed him into a triton warlock similar to the triton warlock character in our game, Jamras. Jamras knew Krell and vice versa. Jamras, being a warlock of the Great Old One, is an easy recruit for Krell, so he thinks.
Krell can be easily reskinned into whatever villain best fits the campaign and the backgrounds of the characters. A warlock of Tharizdun fits well but we can just as easily reskin him into any villain that either fits our characters or fits the story.
The giant octopus is likewise reskinnable. This octopus might instead be a giant ink-black whale with the powers of a great old one warlock that killed the parents of one of the characters. It might even be a full-fledged kraken. This is a good opportunity to connect the big environmental monster in this adventure with the one in The Styes.
The Flexible Chest
Finally we come to the chest. As mentioned above, we can put anything in it that drives the story forward. In my own game, some truthful but damaging evidence against one of the council members fit very well. What will the characters do with proof that Eda Oweland sold Saltmarsh citizens into slavery five years ago? How will that tip the scale of the council? What secret organization wants this information to get out and why?
A chest like this is a great gift for the story of our game. We can put anything in it that helps that story move forward.
The Gonzo Conclusion
The real fun of Salvage Operation hits when the giant octopus, or whatever you turned it into, attacks the ship. The ship starts falling apart. The characters start scrambling while the world crashes around them. Do they keep fighting the villain? Do they grab the box and flee? The continuing escalating chaos makes this scene shine. Let things get out of control. Drop new challenges in front of the characters and help them overcome them. Maybe some of the characters can swim but others can't. Maybe others make it into the water only to see a sea of specters from the roaring storm rushing in.
A Simple Reskinnable Adventure
Salvage Operation is one of those perfect small focused adventures with lots of room for us to shape it and prune it into the adventure that best fits our story. With a straight forward storyline and some clear reskinnable areas, we can take the bulk of this adventure and turn it into one tailored perfectly for our own campaign.
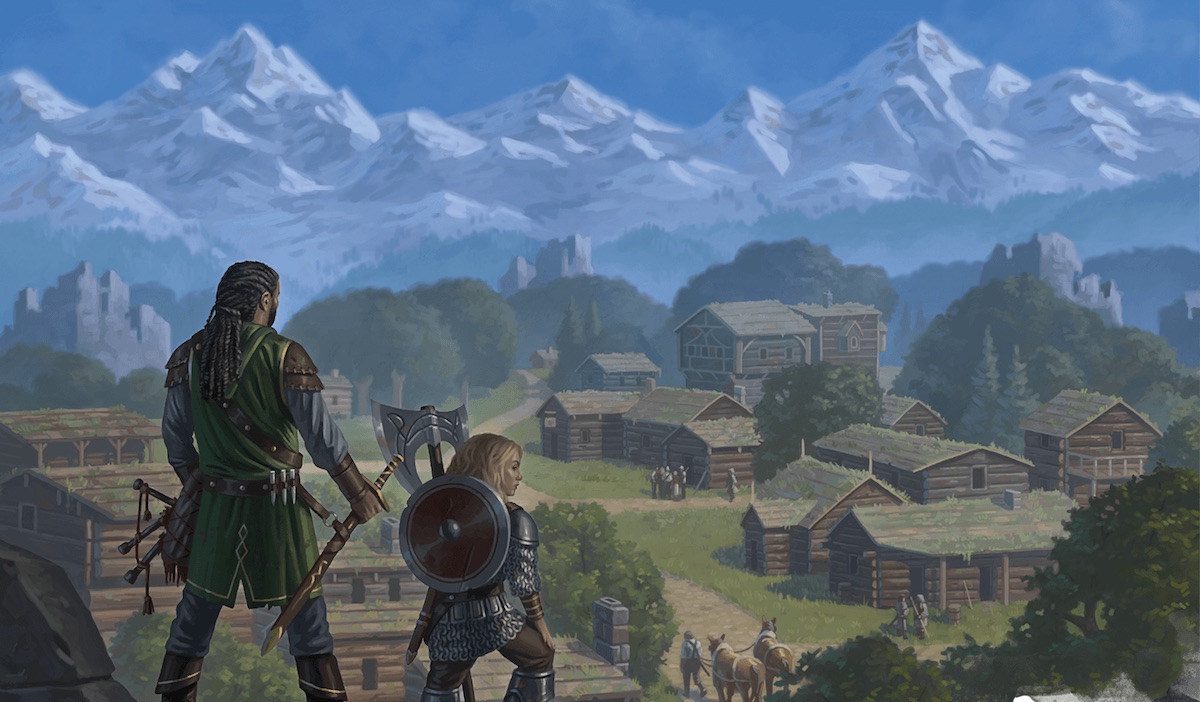
This is an evolving article offering tips for running the D&D Essentials Kit adventure Dragon of Icespire Peak. I'll be updating this article as I run the adventures in the book and gain first-hand knowledge on how to run each of the quests within them.
Please also note that this article includes spoilers for the adventure Dragon of Icespire Peak.
The D&D Essentials Kit is the first new entry point for Dungeons & Dragons since the original and excellent D&D Starter Set released by Wizards of the Coast in 2014. The D&D Essentials box includes everything a group needs to play D&D including the adventure Dragon of Icespire Peak. In this article we'll talk about how to get the most fun out of this adventure.
In addition to this article you can watch this Dragon of Icespire Peak video discussion including tips for the first quests in the adventure and thoughts about one-on-one play.
Table of Contents
Click the links below to jump to a particular section in this article.
Here's a quick list of tips, further described in this article, for getting the most fun out of Dragon of Icespire Peak.
Give one of the 1st level characters a relic that casts aid on the party; increasing their hit points by 5 for 8 hours.
Showcase the dragon.
Be careful with 1st level characters. Replace the ochre jellies in Dwarven Excavation with gray oozes. Limit the combat effectiveness of the manticore in Umbridge Hill and the mimic in Gnomengarde.
Add interesting flavor and treasure to Dwarven Excavation.
Ensure the characters have access to the spell magic weapon before facing the wererats in the Mountain's Toe Gold Mine quest.
Reduce the number of orcs and ogres at the Shrine of Savras if you have fewer than four characters.
Image may be NSFW. Clik here to view.
The Danger for 1st Level Characters
1st level characters in D&D are delicate. A 1st level D&D game is almost a different game. In another article, Building 1st Level Combat Encounters, I recommend the following for 1st level adventures:
Keep monster challenge ratings to 1/4 or less.
Include fewer creatures than characters.
Limit average monster damage to 5 (1d6+2) or lower.
Given the low hit points of 1st level characters, the above guidelines ensure they won't get wiped out in their first combat.
Unfortunately, Dragon of Icespire Peak does not follow these guidelines. In the first three adventures, intended for 1st level, the characters face a ochre jelly (CR 2 with immunity to slashing), a CR 2 grappling mimic, and a CR 3 manticore that can inflict up to 21 damage on a turn. Any of these monsters can easily kill a 1st level character. Some groups can get lucky when facing these foes but many may not.
One way to help the characters survive their initial quests at 1st level is to give the characters a relic that casts aid. This relic may only be usable once or you might give it three charges. Aid increasese the hit points of characters by 5 for 8 hours; a big boost for 1st level characters. This relic can be a family heirloom of one of the characters or something given to them before they begin their adventures.
Showcase the Dragon
Dungeons and dragons; that's what people want to see and Dragon of Icespire Peak has both. While our characters can hear about the dragon from their first visit to Phandalin, it's something else to see it. When rolling on the "dragon location" table in the "Running the Adventure" section of the adventure book, it's unlikely the dragon will show up at the very location the characters visit. It may, however, be somewhere nearby. When you roll on the dragon's location and its close to a location the characters are traveling to, give them a chance to see the dragon from afar. Nothing beats seeing a dragon in Dungeons & Dragons. Help make it happen.
Individual Quest Tips
The rest of this article contains advice for each of the quests in Dragon of Icespire Peak. I'll add more quest tips and summaries as I run through the adventure.
Dwarven Excavation
The Dwarven Excavation quest is a fun exploration of a mysterious temple to the evil dwarven god Abbathor. The text is light on details but adding in interesting information about Abbathor can make the whole temple come to life. You can learn more about Abbathor from Mordenkainen's Tome of Foes or read about him at the Forgotten Realms Wiki. Characters can make Intelligence (History) or Intelligence (Religion) checks to learn details about Abbathor and his devious followers as they explore his lost temple.
You might add some lightweight traps to some of the doors in the temple ruins to tie in with the theme of Abbathor. Don't include any traps that will wipe out 1st level characters but small dagger, dart, and poison traps fit the theme. The trap generator or the random trap generator from the Lazy DM's Workbook can give you some interesting and devious traps. In general, traps should have +4 to hit, DC 12 saving throws, and inflict about 3 (1d6) damage. The ancient nature of the temple can explain why these traps aren't as deadly as they once were.
The ochre jellies in this quest can be very deadly for 1st level characters. One easy solution is to replace them with either CR 1/2 gray oozes or CR 1/4 dwarven skeletons wearing tattered cloaks and hoods. If the characters are 2nd or 3rd level and have more than two characters (not including sidekicks), you can stick to the jellies but their immunity to slashing and splitting on a slash can still be very deadly.
For all of the mysteries and secret doors in this dungeon, it is light on treasure. The final chamber, according to the text, takes 40 hours to dig through and includes no useful treasure; only a deadly trap. We can reduce the time it takes to dig to this chamber to 40 minutes instead of 40 hours and include a magic item or a relic to reward their exploration of the dungeon.
Umbrage Hill is one of the shorter quests in Dragon of Icespire Peak and makes for a great 1st level challenge. The characters arrive at the hill and find a manticore harassing Adabra Gwynn the apothecary. This adventure needs only a little modification. If played to the fullest the manticore can be a deadly opponent, firing three tail spikes from the air per round for an average of 7 damage each. We might describe how the windmill is riddled with tail spikes and that the manticore only has a few left. Should combat begin, the manticore might fire only one tail spike per round instead of three. The manticore might also start off wounded by the dragon, coming to Gwynn for her potions of healing. This offers another line of negotiation other than paying 25 gold pieces to the manticore. Perhaps it needs that 25 gold pieces for a discounted potion of healing from Adabra.
We can also add some flavor to the dwarven graves here, providing some history of the Besilmer dwarves, a potential lead-in to Princes of the Apocalypse or other dwarven nations. We can also drop in a relic to offer a reward to the characters for their exploration. Such a relic might cast the spell magic weapon thrice, helping characters deal with the wererats in Mountain's Toe Gold Mine.
This adventure has a heavy slant towards roleplaying and it behooves the DM to spend some time considering how the gnome NPCs will act and react to the characters. The mystery of the mimic's killings can be stretched out into an Alien-style hunt throughout the caves. When the characters actually face the mimic, the variant option to have the mimic speak common can make for a more interesting interaction instead of a simple slugfest. In combat the mimic can be quite dangerous, potentially adhering characters and biting them with advantage for 11 damage. To be nice you can forgo the acid damage.
Mountain's Toe Gold Mine is one of the three second-tier adventures in Dragon of Icespire Peak. The warning at the front of the adventure is one to heed. If things turn to combat in this adventure and the characters don't have any magic weapons, there's a good chance they'll get killed. In this case, failing forward is an option. The wererats beat up the characters but then offer them a deal instead of killing them. In return for their freedom, they must go to the Shrine of Savras and clear it out so the wererats can return there.
The scaling of monsters for smaller groups can be tricky in this quest as well. If the two door guards from area 1 follow the characters to the main hall in area 4, that could end up being a lot of monsters per character. Instead, reduce the number of wererats to a maximum of about one per character (not including sidekicks) if possible.
If the characters are headed here without magic weapons, it might be worth dropping a magic weapon casting relic into their hands before they come here.
The Shrine of Savras isn't an actual quest but can become one if the characters talk to the wererats in Mountain's Toe Gold Mine instead of fighting them (which is probably a good idea if they don't have magic weapons).
The Shrine has scaling options for the levels of the characters but these might still scale too hard. For example, a 3rd level character with a sidekick can end up facing three orcs and two ogres according to the rules. Instead, consider removing one of the ogres and spreading out the orcs so your single character and sidekick don't get pummeled to death under the orcs' powerful battleaxes.
The situation at the shrine also makes it impossible to sneak up during the day and very difficult to sneak up at night. Instead, include some large natural rocks sticking out of the hill that can give characters a chance to sneak up on the tower undetected by the orc sentry. If the orc does see them, it might not alert its friends right away thinking it might take care of these foes itself.
This article will be updated with further tips for running each of the quests in Dragon of Icespire Peak. Keep an eye on this page for future updates.
The D&D Essentials Kit and Dragon of Icespire Peak will likely bring new players and new DMs to the wonderful hobby of Dungeons & Dragons. These quests are just a taste of the fantastic adventures to come. For further adventures and recommendations, see our Guide to Published Adventures. May you find endless fantastic adventures with your friends and families in your future.
Noticing, studying, and disarming traps is a common activity in Dungeons & Dragons and yet it can be difficult to understand exactly how it works. Likewise, depending on the situation, it can be difficult for us DMs to understand how best to describe what is happening in a way that still fits the fantastic tales of high adventure we want to share. Today we're going to look at two things: the tricky workflow for detecting, investigating, and disarming traps, and how we can let these situations flow into the rest of our story.
Image may be NSFW. Clik here to view.
The Mechanical Flow of Trap Detection
The most useful description for trap detection appears in chapter 5 of the Dungeon Master's Guide on page 120 and 121 under the heading "Detecting and Disabling a Trap". If you're confused about how the flow of trap detection works, start with that section to understand the rules-as-written.
In short (and you really should read the DMG description if you haven't already) traps are first perceived (or not...), then investigated, and then disarmed.
Perceiving a trap. Perceiving a trap requires, you guessed it, perception. When a trap is perceived, the danger of the trap is noticed. According to the DMG, this means the character succeeds in noticing the trap. There's some wiggle room in there that we'll discuss in a minute. This perception can either be an active roll or a passive check. Jeremy Crawford blew this topic wide open with his discussion on passive perception during a Sage Advice episode (jump to the 22 minute mark to hear about passive perception).
Investigating a trap. Once a character notices a trap, they might need to investigate the trap to understand how it works and how to disarm it. This investigation may either take place by the player describing how they mess with the trap or might take place by rolling an Intelligence (Investigation) check. An Intelligence (Arcana) check can be used to detect and investigate magical traps as well as disarm them. The type of trap and its setup could determine how this investigation takes place and how well it works.
Disarming a trap. Disarming a trap can require a few different potential skills. Like investigation, a character might be able to foil a trap without rolling any check at all. Holding a shield up in front of a chest that fires off poison darts might be enough on its own that no check needs to be made. Other traps might require a Dexterity check using thieves' tools if they are mechanical or an Intelligence (Arcana) check if they are magical. Other abilities can likewise foil a trap such as Dispel Magic.
On Passive Perception
This all seems rather straight forward but there are some edge cases that can complicate things. First of all, how much can be detected with passive Perception? As Crawford mentions, and this RPG Stack Exchange thread clarifies, passive Perception acts as a lower floor for a Perception check. It's always on, even if a character attempts an active Wisdom (Perception) check. It's the minimum of what they see. The DMG clearly says that you can compare the DC to detect the trap with each character's passive Wisdom (Perception) score to determine whether anyone in the party notices the trap in passing. This gives us some wiggle room, though, and we may want to take it. Sometimes characters have insanely high passive Perception scores; like above 20. The observant feat can give them an even higher passive Perception. Obviously we don't want to negate or work around this. Players chose these options in particular for their characters.
But we can change what they see with passive Perception. This can depend on the story and the situation. We can be sure that a character with a passive Perception higher than the DC of a trap notices danger ahead, but they might not know what danger they see. This would require its own Intelligence (Investigation) check to learn more about what is going on with the trap. Like passive Perception, a passive Investigation likely acts as a lower floor for investigating the mechanics of traps. Again, we can decide what information comes up from this. Yes, you see danger ahead (high passive Perception). Yes, you see that there are deep grooves surrounding some of the tiles in the floor ahead and believe they move or can be moved (high passive Investigation). That doesn't tell you exactly what is going on but smart characters (and smart players) will test it out and see. Maybe they back up and toss something heavy on the tile. Maybe they duck out of the way and press a torch down on it only to see a poisoned barbed dart hit the torch. They still learn things by actually investigating.
One note about passive Perception I missed until DM David brought it up in his excellent article on group ability checks; the lighting matters a lot. Dim lighting for those without darkvision drops passive Perception by five. The same is true for total darkness and those with darkvision. Keeping track of the lighting tells you how easily the characters can actually perceive. We're not monsters, though. We should likely mention this difficulty before the characters start wandering into pit traps. "The total darkness in this chamber makes it difficult to see well, even for those of you with darkvision." Give them the reminder and they'll likely need to fire up some light to avoid the penalty to their passive Perception.
A Faster Narrative Description
Maybe you want to take this a different way and use those passive scores to smooth out the description of the story. In the adventure Isle of the Abbey in the adventure hardcover book Ghosts of Saltmarsh, there is a hallway filled with traps known as the "Winding Way". Many of the traps can be detected with a passive Perception of 16; some need as high as 19. There are enough of these traps that, instead of going through the full flow of trap detection stages mentioned above, we can just describe what they see:
"As you travel through the Winding Way you notice and avoid dozens of traps designed to thwart run-of-the-mill tomb robbers; but you are no casual tomb robber. Poisoned darts drip from hidden shafts. Large overhead rocks threaten to smash intruders into thin pink paste. Illusionary floors sit atop fields of poisoned spears upon which are impaled the skulls of those less perceptive than you. You journey through the Winding Way noting these deadly traps as you make your way to the vaults of the dark priests."
Obviously you need not read something like that aloud but you can describe how the characters avoid these traps without going through every step of the process. You might mention that other more cunning traps may not be as easily discovered. The pit traps, for example, require a DC 19 passive Perception to detect which a group of characters simply may not possess.
Working With the Players, Not Against Them
Traps are one of those areas where antagonistic DMs clearly run a different kind of game than character-focused DM. Antagonistic DMs take a "you deserve what you get" approach, sitting back and giving only whatever information they have to based on the questions the players ask and the rolls of their characters. Instead, we can work with the players. Yes, we know where the traps are but there is a huge translation problem continually occurring when we run our D&D games. We're describing places that don't actually exist from images on our heads and hoping that the same images transfer intact into the heads of the players.
In the Elements of Style (a mandatory read for writers in my opinion), EB White says "most readers are in trouble about half the time." The same is true for players at our game. With any description we describe, our players are probably not understanding it about half the time. We need to work with our players, clarifying our descriptions, and giving them material to work with.
The characters in our D&D game, for the most part, are experienced adventurers. They're not going to do stupid things. We can assume that, by the time they've been through a few dungeons, they know how to stay out of the way of explosive runes when someone is trying to disarm them. They know how to duck behind a corner so as not to be in the path of poisoned darts.
We should assume that the characters are seasoned adventurers, not idiots, even if our players aren't fully grasping what is going on or spending a bit too much time on their phones. Find other ways to bring them into the game than sticking poisoned darts into the faces of their characters.
Another Tool for Tales of High Adventure
The whole flow of traps and trap detection, like all elements of our D&D games, is here to help us share a story. Traps are pieces of the world, a moment of stress and resolve, that fits in with the rest of the tales we share. It's a careful balance to ensure tension and resolution don't turn into frustration, tedium, or boredom. When we understand how traps fit into our story and keep the flow of trap detection at the right pace, we can keep the energy high and put traps in their rightful place as sinister agents of the stories we share.
Like those articles, this article contains spoilers for Ghosts of Saltmarsh.
Image may be NSFW. Clik here to view.
A Reskinnable Fixer-Upper
Like Salvage Operation the third adventure in Ghosts of Saltmarsh, Isle of the Abbey is an highly reskinnable adventure. The central hook, the backgrounds of the clerics, and the item they covet in the Winding Way can all be reskinned to suit the campaign we're running.
Unlike Salvage Operation this adventure needs work to bring it up to par with the other adventures in this book. It is, in my opinion, the weakest of the first four adventures in the book.
Here's why. First, the island can get boring once the characters have made it through the skull dunes. Second, the entrance into the abbey is problematic in its design. Third, the winding way can be a boring character-punishing trap-festival filled with a strange menagerie of "CR-appropriate" combat encounters that go on and on and on.
We'll dig into all of these problems and how to fix them throughout the rest of this article. For now, let's look at how we can twist this adventure into one that supports our current story.
Reskinning the Hook
The first big reskinnable feature of Isle of the Abbey is the story hook itself. Who wants to build something on the isle and why? Perhaps it's Mannistrad Copperlocks, the head of the dwarven miners, who wants to clear the island so she can build a new watchtower. Maybe it's the council of Saltmarsh who wants to set up the watchtower and lighthouse to look for the sahuagin threat. Maybe it's a secret Scarlet Brotherhood ploy that the characters fall for. Whatever hook sinks deep into the characters works best and we can tune it however we wish. Someone wants to build something on the island for some reason. We get to decide what, for whom, and why.
Whatever hook we set in, we'll want to ensure that the characters become aware that they must stop or defeat the clerics of the abbey in order to accomplish it. Waves of necrotic energy may be continually reanimating the skeletons on the beach; something that must end if our patrons are going to rebuild a tower or lighthouse on the beach. We'll want to reinforce this throughout our running of Isle of the Abbey so that the players never have to ask "why are we doing this again?"
Reskinning the Clerics
Other than being described as "evil", the clerics in Isle of the Abbey have few details. We can choose what god or gods they follow depending on what fits our story. In my own campaign I turned them into refugee clerics from the Temple of Elemental Evil who came to the abbey to study the Elder Elemental Eye. This ties in nicely with a larger Chained God / Elder Elemental Eye / Tharizdun thread we can string throughout these adventures culminating in the Styes at the end of the book. If you want to connect well with the previous adventure, Salvage Operation, you can tie the clerics to Lolth and fill their abbey with all sorts of regalia of the spider queen.
When we define the theology of the clerics, we'll want to wrap the whole adventure in that lore. We can add giant carvings in stone of the four elemental symbols surrounding a huge symbol of the Elder Elemental Eye. We can give the clerics powers reminiscent of their former elemental bent. We might even pull up those stat blocks for the cultists in Princes of the Apocalypse which fits well in our elemental-themed take on the clerics of the abbey.
The adventure, as written, has very little of this flavor in it already so defining such flavor is up to us. Pay attention to those secrets and clues!
What's In the Treasure Room?
Our final bit of customization for Isle of the Abbey comes with the contents of the abbey's treasure vault. The Winding Way, the main dungeon part of this adventure, guards a treasure vault with oodles of traps and monsters. We'll want to ensure whatever is in that vault is worth the effort.
Perhaps it contains an intelligent mace of disruption or sun blade filled with the lawful good spirit of a planetar who waged war against the very god the clerics worship. Perhaps the clerics have placed the item in an unholy pool that inverts its holy energy into the very waves of necrotic energy roaring across the island. Perhaps only the undead can reach into the pool and take it out; something they're not likely to do. Any living creature reaching into the pool suffers the effects of a finger of death, a final deadly trap to protect this powerful weapon.
We can put any item or items we want in this vault as long as it's important enough to warrant the difficulty of traversing through the Winding Way. The characters should know why they're braving a deathtrap dungeon before they bother to step inside.
Improving the Island
Isle of the Abbey is one of the more flawed adventures in Ghosts of Saltmarsh. First, the island itself is bland. The initial incursion to the Skull Dunes is great fun, although high perception checks can get a group through it too quickly. Consider halving the result of a Wisdom (Perception) check to see how many square the characters traverse before running into a pile of skeletons. We can, if we choose, skip the skeletal swarms which are a bit anemic in my opinion with an actual big pile of skeletons. Try 25 skeletons and see how the party fairs. You can roll for them normally, assume a quarter of them hit or save at any given time, or use the mob calculator to run that big pile of skeletons. The skeletal juggernaut is great fun conclusion to their battle on the beach as well.
Once the characters get past the Skull Dunes, it's basically a straight shot to the monastery.
We can make this journey more interesting by flavoring the island based on the background of the clerics. If they're members of the elemental cults, maybe we see huge symbols of the elemental sects or statues to the Elemental Princes themselves. Huge stone idols or great summoning circles or carrion pits filled with sacrificed victims; any of these can bring more flavor to the island. Make them big and make them old.
If you're hard pressed for an idea, drop in an ancient monument to spice things up.
You'll also definitely want to throw in an NPC. Skeen the pirate mentioned in the table of complications can be a good NPC to drop in. Too much combat can get boring and players generally love talking to folks. Skeen can be a great source for some secrets and clues.
Shaking Up the Design of the Abbey
The map for the abbey isn't ideally suited for careful exploration. The abbey's single staircase leads into a main hall surrounded by eight rooms, many of which have occupants who can hear the characters coming. All of the careful details about the NPCs goes out the window when they all come rushing into the central room daggers high.
You might consider changing the configuration of the room into a hallway leading into the main hall with side-halls leading to smaller rooms so the whole thing is less cramped.
If you want an entirely new configuration, try out one of Dyson Logos's maps instead. Many of his maps have far better configurations than the single hall with eight attached rooms. If you do run it as is, consider removing some of the extra characters so it's not nearly as painful to fight through.
The Downward Beats of the Winding Way
In a previous article I talked about the downward beats of dungeons. That article came from my experiences running the Winding Way. This half of the abbey is a festival of traps, tricks, and rooms full of monsters. The monsters are quite a mix too. Three out of the four main encounters in the Winding Way contain "deadly" encounters.
So let's rebuild it into something better.
Image may be NSFW. Clik here to view.
Handwave the traps. If the characters have a passive Wisdom (Perception) of 16 or higher, they'll see most of the traps outright and be able to avoid them. To make this more heroic we can skip over the detailed workflow of trap detection and inform the characters that, due to their keen eyes, they are no mere tomb robbers and manage to avoid many of the deadly traps that would have felled lesser adventurers. We might keep a few traps handy and, if they get boring, we can always grab a random trap from the Lazy DM's Workbook or our handy trap generator and spice them up.
When the characters get into fights and decide to fight out in the hall, we might impose a DC 10 Intelligence check to see if they remember to avoid one of the hallway traps. A fall into a pit isn't out of the question on a failure.
Add harassing specters. We can also grab the specters from room 11 and use them to harass the characters while they navigate the hallway. Specters aren't particularly powerful when compared to 5th level characters but they're really nasty when they can float through walls, hit, and run. Their reasonable dexterity gives them a good chance at gaining surprise and their lifedrain is no fun for anyone at any level. These guys will be quite annoying but a lot of fun at the same time. Just don't overdo it.
Changing up the monsters. We can use some of the monsters listed in the encounters but we'll probably want to mix them up. A bodak might be cool but ogre zombies and ghasts just eat up time. We can decide which rooms have what, perhaps giving each room a theme based on the themes of the clerics in the temple. Maybe each room is an elemental node with a single negative energy room (complete with a bodak) for the node of the Elder Elemental Eye. The vampire statue is pretty cool, as is the crystalline minotaur statue. The two statues in the final treasure vault may be better off as mummies; the original tomb guardians. Even a mummy lord isn't out of the question. These ancient dead priests protect whatever item of great power resides in the final chamber of the Winding Way.
A Scaffold of Adventure
Isle of the Abbey requires more work than the other adventures in Ghosts of Saltmarsh. Like Salvage Encounter we can reskin much of it to fit the story we want to share. Unlike that adventure, Isle of the Abbey requires a lot of work to fix up as well. Hopefully this article gives you ideas how you can twist this adventure into an awesome experience for your players.
Many times when we're running our Dungeons & Dragons adventures, we aren't too worried about time. Sure, our friends need to go home sometime but we can generally stop where we are and start off where we ended at our next session. If we're particularly good at this we might even find great breaking points that keep the players on the edge of their seat and bring them back the next week. We might even be running episodic games in which each night is itself a full story arc strung together with downtime and an overall story that plays out in full pieces each session.
Sometimes, though, time is a factor. If we're running a single-session game for our friends, a one-shot game at a convention, or an organized play game at a local game shop; we have only the time allotted and must fit the adventure in that time. This can prove challenging; maybe the most challenging aspect of our game.
Image may be NSFW. Clik here to view.
While writing Ruins of the Grendleroot, I paid a lot of attention to this. I wanted to ensure that these adventures could fit comfortably in a two- to four-hour session. But I also wanted open-designed adventures with lots of options across the adventure and in each encounter. These design ideals often work against one another.
For example, let's say we have an encounter with a group of cultists. If the characters talk to the cultists, it might take ten minutes to finish the encounter. If they get into a fight, it might take thirty. If they try to sneak around and fail, then talk their way out and fail, and finally fight; such a situation might take an hour.
How the characters interact with an encounter has a big impact on the time it takes to run that encounter. Multiply that out by the number of encounters in the adventure and you could have an adventure that takes an hour or six depending on how things go. Given that we're generally aiming for around four hours, give or take, a window that wide isn't useful.
So what do we do? How can we tune and pace our adventures to fit in the allotted time with such unknown variables? That's what we're going to look at today.
Some of these tips work well when you're creating your own adventures, even if you're not writing your own adventures for publication. Other tips work well if you're running a pre-published adventure and need to modify it to fit the time you have. Your own situation may vary but hopefully these tips can help out for any given situation you have.
The Moving MacGuffin
One of my favorite adventure books is the book Weird Discoveries by Monte Cook Games for the Numenera game system. It's a poorly kept secret that I used this book as my model when writing the original Fantastic Adventures. I loved the idea of ten easy-to-prep and easy-to-run adventures that helped GMs get the story going and end it on time with just four pages per adventure.
The folks at Monte Cook Games put out another similar book called Explorer's Keys that's equally good. These books have some very specific design ideas, including layout and graphic designs, that make them easy to prepare and easy to run at a table. I'm really in awe of them.
In particular, Explorer's Keys includes "keys" that are the main required plot elements that help the characters complete the adventure. These might be a powered object required to move a huge alien tank. It might be information on an NPC required to prove or disprove an allegation. It might actually be a key to open a great vault door.
The secret to these keys is that they don't have to be in one particular place. In Explorer's Keys, you decide where the keys show up. This lets you tune the adventure as you're running it, shortening things up when needed by making keys easier to find or lengthening it by pushing the keys further out.
We can do this in our own adventures by moving the MacGuffin. The MacGuffin, an object integral to the story of the adventure, might be nearby and easy to acquire or it might be hidden far away and require quite the journey to acquire.
A MacGuffin may not necessarily be an object. It might be an NPC the characters have to kill or rescue. It might be a piece of information they need to acquire. It might be a switch they have to pull or an obelisk they have to deactivate. A MacGuffin may be an entire room, perhaps a boss encounter area. If the adventure needs to speed up, we move that whole room forward. If it needs to slow down, the room moves further out.
Moving the MacGuffin is a solid technique both in our own adventures and when running published adventures. In published adventures we can move the required key, whatever it is, within closer reach of the characters. We might move that basement lab up two floors so the characters don't have to travel as far.
We might not even need to worry about time to move the MacGuffin. If the pace of our adventure is starting to wane and get boring, we can up the excitement by bringing the MacGuffin closer. If we want to space things out, we can move the MacGuffin further away. Timing a session is one thing but oscillating those upward and downward beats is important too and having some flexibility to change up that pacing during an adventure is critical.
If we're writing our own adventures, we can include this design right in them. In Ruins of the Grendleroot each adventure includes a "Pacing the Adventure" section that often describes how to move key elements closer or further out depending on the pace of the adventure you want.
Moving the MacGuffin is all about bringing the required element of an adventure closer to the characters or pushing it further away.
Optional Combat Encounters
Combat encounters often take time. If we're pulling out our minis and dropping down our gridded battle map, we can expect a battle to take anywhere from 30 minutes to an hour. Combat encounters, beyond being just plain fun, are also great tools to help us fill out a game if we have time to fill. Obviously such combat encounters need to matter. They need to tell a story and they need to be fun. Combat encounters that don't help reveal parts of the story or make sense within the fiction are just a slog.
Combat encounters are a dial we can keep our hand on while running our game. We can omit them or add them in depending on the timing and pacing of our game. If things are getting boring and stale, maybe time for a conflict. If combat is getting repetitious, we can pull them out.
If we're planning out our own adventures, we can keep a few combat encounters on hand. If we think we have the time and we think it will add to the fun, we can drop them in. If we think things are already moving slowly and time is a factor, we can hold them out.
Likewise, if we're running a published adventure, we can take note of which encounters we might omit if time becomes short and which ones we might add if it looks we have the time and it feels right for the story. We can increase or decrease the number of monsters in any given encounter as well. A well-designed random encounter, like those in Waterdeep City Encounters, can add a lot of fun to a game that has the time to include it.
Timing Events
Every year I run a Halloween Ravenloft game. It's a five-hour game that runs like a roller coaster through Castle Ravenloft. Part of the rules of this home-run adventure, stated up front and with a visible countdown clock, is that 45 minutes before the end of our session Strahd is going to show up. The players have the rest of the adventure to try to find the three icons of Ravenloft before they will face him.
Putting in a real-world timer into a single-session game is a great way to ensure you stay on time and that your players know it. Any timed event can work this way. The characters might have three hours to restore the glyphs before the demon enters the world. Fail and he shows up to face them with his full power. An assault is going to occur on the characters' home town. The characters have to thwart the assault and destabilize the attackers before the assault begins. An hour before the end of the session they face whatever forces remain.
Any time we have an urgent event in the game, we can turn it into an urgent event outside of the game. We make it clear to the players that they are timed and they'll speed up. Regardless of their actions, some conclusion occurs. If they did well, they've swayed the odds in their favor. If they didn't move quickly, the odds are against them.
Timed events like this is a powerful tool to keep an adventure running on time.
Pacing Throughout an Adventure
It isn't enough to pay attention to the timing of an adventure as it gets closer to the end. I've seen this problem time and again with organized play games. We need to have a hand on these dials all throughout the adventure. We don't know when the game will speed up or when it will slow down. We need ways to change the pace all throughout an adventure, up until the very end. Adding or removing a combat encounter in the beginning of the game may help set a general pace but it may not help if things unexpectedly speed up or slow down later. We'll want to be prepared to move MacGuffins and cut encounters up to the very end of the adventure.
Don't Cut Off the Crescendo
Above all, though, we don't want to cut off the high point of the adventure. I witnessed this first hand in many convention-run Adventurer's League adventures. The DM ran things as-is throughout the adventure and instead of cutting from the middle, they cut off the final battle. Just when the battle was turning in favor of the characters they stated that they were going to "end it right here" and called the adventure over. That's cutting off an adventure right when it should be at its most climactic.
Instead, early battles can be cut out completely or run in a faster theater of the mind style to move up the pace of the adventure so such a conclusion has a greater impact.
Keeping Your Hands on the Dials
I like to imagine that a DM has hands on all sorts of dials while running a D&D game. Some of these are dials of challenge and pacing, some of them are timing. Our need to tune an adventure doesn't end when we begin to run it; we should be tuning our adventures as we're running them up until the very end of the session. Some dials are relatively minor like changing the hit points of a monster to speed up combat or increase threat. Other dials are much bigger, pulling out combat encounters or even entire levels of a multi-level dungeon.
When we're running our D&D games, the world is ours to manipulate to give us and our players the best four hours of entertainment we can create.
"Good relationships keep us happier and healthier. Loneliness kills."
The above quote is from Dr. Robert Waldinger, the caretaker for the Harvard Study of Adult Development, an 80 year study that followed the lives of 724 men, some from Harvard and others from a poor neighborhood of Boston. Across the 80 year study, the participants were surveyed and the results gave an in-depth look at how the lives of these men evolved.
This study found that the quality of their relationships with others mattered more towards their happiness and health than just about any other factor. While we often seek money, fame, and career achievement as lifelong goals; our relationships have the biggest effect on our happiness and health. On the flip side, loneliness kills. Being frequently lonely can be as bad for you as smoking 15 packs of cigarettes a day.
D&D used to have the reputation of being for basement-dwelling social misfits and yet the relationships we built around the table will matter more for our happiness than our careers, our income, and our general popularity and fame. The relationships we build while playing D&D are the exact thing we should be seeking to make us happy throughout our lives. I am never so happy as I am playing D&D with my friends and family.
Image may be NSFW. Clik here to view.
The Difficulty in Finding Adult Friends
As we get older it's hard to find the sorts of friendships we had while we were younger. Time pressures, career pressures, and the pressures to start a family can get in the way of building and developing the meaningful friendships that create such happiness in our lives. Many of us move away after college, losing our physical connections to friends we had while in school. We also fill our time with jobs, career growth, and building a family. It becomes harder to find the time to get together with friends. It doesn't help that bullshit feelings of masculinity gets in the way of adult men finding friends.
We also lack the context we once had to help us make friends. What do we do when we get together? What do we talk about? Work? Kids? Politics? The weather?
If only we could find a context around which we can get together with our friends on a scheduled time, relax, joke, enjoy ourselves, and share fantastic stories; maybe even stories that go well outside what our own reality looks like.
If only there was a way...
Playing D&D Can Save Your Life
Playing Dungeons & Dragons sounds just about perfect. I can't speak for everyone but I know that I am happiest when playing D&D with my friends and family. Having a regular D&D game gives me a purpose for getting together regularly with my friends. Scheduling and setting aside a regular time to play D&D helps likely leads us to greater happiness and health throughout our lives.
If we find ourselves moving to a new place, we can use our love of Dungeons & Dragons as a way to find new friends in the area. We might visit and hang out at our friendly local game shop or join up in a local Adventurer's League game. We might use a variety of tools to help us find and maintain a D&D group. If you're willing to be the dungeon master (and I hope you are), it's even easier. There have always been more people who want to play D&D than are willing to DM. With the new D&D Essentials Kit you can play with a single player and a single DM, although more players mean more friends and friendships are what it's all about.
Love the Ones Your With
Just like our human need for social relationships to be happy and healthy in our lives, we have other instincts that push us away from that benefit. What if our group isn't as good as another group? This problem likely falls under the fear of missing out, a social anxiety that drives us to be where others are. The internet exasperates the problem by showing us idealistic situations that we wish we were in (often not nearly as good as they seem) and making us believe we're seeing the typical D&D game. What would it be like to be at Matt Mercer's game, we imagine? We imagine it must be the most incredible experience in D&D we can imagine. In reality? It's probably a lot like every other D&D game, just with a lot of cameras and 15,000 people watching. I'm not saying Matt Mercer's game isn't awesome. It is.
Instead of worrying whether some other game is better than our own or some other group of people are better than our group of people; let's remember that our group is pretty great and love the ones we're with. Chasing someone else's inner ring is a fool's game. Just ask CS Lewis.
Finding the Time and Making D&D a Priority
"What did you think? We were just gonna sit in my basement all day, play games for the rest of our lives?"
When Mike says this to Will in Stranger Things Season 3, it's hard not to hate the scene, hate Mike, and even hate the show. Until, of course, you realize that the Duffer brothers knew exactly what they were saying and why.
Of course you can sit in your basement and play games the rest of your life. Maybe you'll even upgrade to the dining room.
Finding time to play D&D is important. It's as important as finding time to eat healthy and exercise. It's probably more important for your happiness than trying to boost your career or make more money.
Feeling guilty about playing D&D is like feeling guilty about going to the gym. It can be as hard to find time playing D&D as it is to find time to exercise. Finding the time to play and the people to play with is likely the hardest part of D&D. For your happiness, though, it's worth the effort.
While writing this article I asked Twitter how people managed to keep regular games going. Many ideas and trends came up. We can learn how best to get more D&D into our lives from the experiences of others. Here are some of those trends.
Run Games Twice Monthly. While most D&D players tend to play D&D weekly (according to my flawed surveys and polls), many respondents said it was easier to keep a twice-monthly game going than a weekly one. Regular habits tend to stick and a regular weekly game is more likely to keep going than a twice-monthly game but if twice-monthly fits into our lives where a weekly game does not; we're better off with that than nothing.
Play with the family. Many respondents described playing D&D with their spouses and children. It's much easier to fit our games into our lives if our family is involved. You don't have to negotiate with your spouse for a night off to play D&D if your spouse is at the table with you. I'd also bet that playing D&D together brings couples closer together as well, just ask the folks at D&D Duet.
Play online. Being able to play online has been a critical factor for many people to keep a regular game going. Playing online means no worries about location dependence or travel time. For many people it's the only way they would be able to get together to play D&D. Discord, Roll20, and Fantasy Grounds are all popular ways to play D&D online.
Be flexible with your number of players. In the article Finding and Maintaining a D&D Group I recommend keeping a stable of players including six main players and two on-call players who can fill in if someone's out. This has worked well for me for a decade but it isn't always possible. Staying flexible with the number of players required to run a game helps ensure those games still happen. How few members can you have at the table and still run a game? How many is too many? If you have a wide margin on both ends of this spectrum, you'll be more likely to run a game. Three to six is my personal preferred number.
The D&D Essentials Kit now gives us the ability to run a game with as few as one player. That adds a tremendous amount of flexibility. Using the companion rules in the Essentials Kit and the follow-on adventures means you could run all of Tyranny of Dragons with just one other player.
Prioritize D&D. Many respondents mentioned that prioritizing D&D was critical to maintain a regular game. Given the science of happiness and health and its clear tie towards positive social interaction, one could argue that finding the time to get together with friends to play D&D is as critical as finding time to exercise. Negotiating for a night to get together with friends and play D&D can be critical to our happiness long term. Even better, find a way to bring friends home and play with friends and family together.
What is Best in Life? Playing D&D with Friends and Family
When we look at the science of what matters in our lives; what really has proven to bring us health and happiness; it isn't money, it isn't fame, it isn't our careers. It's our family and friends. It's building and maintaining positive relationships in our lives.
If you're reading this article, you probably already love D&D. You might not realize just how much you love it. You might not also consider just how important it can be. We love it, yes, but that might not be stating its importance enough.
The D&D Essentials Kit includes the first-ever official rules for running D&D with just one player and one DM. This is a whole new style of playing D&D, although some, such as the fine folks behind D&D Duet, have been playing this way for a while and I imagine other groups have played this way for years. Like running combat without a map or minis, some folks think it is completely impossible while others have done it for years without issue.
Being able to play D&D one-on-one has tremendous advantages. It's much easier to find a group when you only need one other player. Games can go quicker and the story can go further in each session with a single player than with a larger group. The story of the game can focus on that one particular character. The story, maybe the whole world itself, can be built around this single main character. The list of advantages goes on and on. With the right tools and principals in mind for running one-on-one D&D, we might even run a single character through a published campaign adventure such as Curse of Strahd, Tomb of Annihilation, or Tyranny of Dragons.
Image may be NSFW. Clik here to view.
Most of the steps we use to prepare and run our D&D games changes little when we run for a single player. We can still use all the steps from Return of the Lazy Dungeon Master if we choose. The first step, reviewing the characters, becomes much easier and can also have a greater impact on the remaining seven steps. Running the adventure and the story can work just as well with one character (and a sidekick—more on this soon) as it can for four.
One area of D&D, however, requires careful tuning when we run for fewer than four characters—combat.
Combat encounters and monster design in the 5th edition of D&D generally expects four characters. Beyond their raw capabilities, there's a synergy between four characters that one character alone doesn't possess. Simply removing monsters from a combat encounter isn't enough to ensure a battle will run smoothly in a one-on-one D&D game. We DMs have to keep some concepts continually in mind to ensure our one-on-one D&D game plays smoothly.
The goal of this article is to give you the tools to run any D&D adventure, including the official D&D hardback adventures, with just one DM and one player.
The D&D Essentials Kit includes a major aid for running one-on-one D&D—sidekicks. These lower-powered and mechanically simple NPCs are intended to work side-by-side with the main character in a one-on-one game. Sidekicks help bring some of the synergy back when running with only one player but it's still a far cry from four full characters.
A Quick Checklist for Running One-on-One Combat in D&D
Use the following guidelines to help you tune combat encounters when running a game for a single character and a sidekick. This articles goes into each of these guidelines further on.
Reduce the number of monsters the character faces. Be careful when including more monsters than the number of characters including sidekicks.
Reduce the hit points of monsters as needed.
Reduce the number of attacks and damage of monsters as needed.
Remove legendary actions, lair actions, and legendary resistance from legendary monsters. Tune them to suit the battle.
Give the character relics, scrolls, potions, and magic items to off-set their gaps.
Be wary of monster spells or effects that can, with a single stroke, remove the character from combat.
Run larger battles off-screen. Describe groups of allied NPCs facing off against large groups of monsters.
On Sidekicks
Sidekicks, first released in this Unearthed Arcana Sidekick document and then later published in the D&D Essentials Kit, are a big boon for running one-on-one D&D games. Sidekicks help fill in the gaps a single character will have when facing the world in a D&D game. A fighter character, for example, can have a healer sidekick who keeps them healthy. A wizard character can have a defender sidekick who protects the wizard from powerful foes. Sidekicks have skills, abilities, and spells that aid the character as they face challenges ahead. During the game, sidekicks can regularly use the "help" action to give the character advantage on most checks when needed.
The D&D Essentials adventure, Dragon of Icespire Peak, includes rules to level sidekicks up to 6th level while the three supplementary adventures available on D&D Beyond offer rules to take sidekicks up to 12th level. If this isn't enough, or you don't have access to these adventures, you can use the Unearthed Arcana Sidekick guidelines to create sidekicks up to 20th level starting with a baseline NPC stat block. One advantage of the UA sidekick rules is that you can apply them to any stat block in the Monster Manual. Thus, a character can have a town guard, a pet spider, or a flying snake that gains levels as they do.
Tuning Combat Encounters
With a character and sidekick prepared, it's up to us DMs to tune combat encounters to support one-on-one play. It isn't enough to simply reduce the number of monsters, although that's a big part of the equation. We have to remember the lost synergy a single character has when compared to a party of four.
In previous articles we've talked about how to increase the challenge of monsters in D&D combat. This mostly fell into three simple steps: increase monsters, increase their hit points, and increase their damage. These are three big dials we DMs control that can dramatically change the difficulty of a combat encounter. Likewise, when we're running one-on-one D&D games, we can turn these dials the other way, reducing the number of monsters, reducing their hit points, and reducing their damage. That's most of what we need to do when running combat one-on-one in D&D.
Selecting the Number of Monsters
The number one variable in combat difficulty is the number of monsters the characters face. In a one-on-one game, we should pay careful attention to how many monsters our character will face, particularly when there are potentially more monsters than characters. We can use our encounter building guidelines to get a rough gauge for the appropriate challenge rating for a character to face at a given level. We can use the following rough guide to gauge whether a fight might be deadly. In general, a character should rarely face more than the following:
For a 1st level character
One creature of challenge 1/4 or less
For a 2nd to 4th level character
One creature of a CR 1/4 of the characters level.
Two creatures of a CR 1/10th of the characters level.
For a 5th to 20th level character.
One creature of a CR 1/2 of the characters level.
Two creatures of a CR 1/4 of the characters level.
Four creatures of a CR 1/10th of the characters level.
Generally speaking, except in rare circumstances based on the story, should the character face more than four opponents. Four opponents puts a single character at a great disadvantage, particularly when they don't have the synergy of the rest of the party.
Note that, in general, we'll ignore the sidekick when selecting the number of monsters. Sidekicks, while helpful, aren't as powerful as characters.
Two other dials help us control the difficulty of combat in D&D: hit points and damage output. We can increase or decrease hit points as needed to increase or decrease how long a monster takes to defeat within the range of a monster's listed hit dice range. Typically, when facing more characters, we might increase a monster's hit points to keep it around longer. When running D&D for only one character, however, we likely want to reduce a monster's hit points as needed. You'll need to play this by ear as you run combat. If things are taking too long, consider reducing the monster's hit points on the fly. If things are going smoothly, the monster's average hit points might be fine.
Likewise, a creature's damage, including extra attacks, are often intended for use when facing four or more characters. When we're running only one character, we may want to either reduce the damage of an attack or reduce the number of attacks a monster can make.
Let's look at ogres as an example. In the D&D adventure Dragon of Icespire Peak, the characters may face off against two ogres and a number of orcs in the Shrine of Savras. When running for a single character (as I did with Newbie DM) we can start by reducing the number of ogres down to one. One ogre is a significant challenge for a 3rd level character, even with a sidekick, and it's very dangerous when you throw one or two orcs in as well.
A standard ogre has 59 hit points. A really tough ogre could have as many as 91 hit points. A weaker one could have as few as 28. We'll stick to 30 hit points for our one-on-one ogre. An average ogre hits for 13 with a greatclub. A powerful ogre may hit for as much as 20. A weaker ogre may hit for as little as 6. We'll call it 8. If we want to roll dice for damage, we'll convert this to 1d6 + 5. This ogre is still dangerous for a single 3rd level character but it won't knock them out with two hits.
If we're looking at orcs, we might switch their greataxes out for regular battle axes, reducing their damage from 9 to 7 or even handaxes for 6.
We don't have to plan this out ahead of time. We can make these changes as they're needed during the game itself. Pay no attention to that man behind the curtain.
Keeping our hand on the dials for the number of monsters, their hit points, and the damage they put out can help us ensure we're providing the right challenge for the character in our one-on-one D&D game.
Tuning Legendary Monsters
Legendary monsters are built specifically to handle battles against four or more characters. They accomplish this (at varying degrees of success) by including legendary actions, legendary resistances, and lair actions.
Tuning a legendary monster for a battle against a single character and a companion character is mostly a matter of rolling back these advantages. When we're running a legendary monster against a single character and their companion, we can remove the monster's legendary actions, legendary resistances, and lair actions. This brings the monster's damage output and number of actions back in relative balance with a single character and a companion.
Depending on how challenging the fight is, we might have to further modify the legendary monster to bring it in line by the character. We might, for example, need to reduce its hit points to put it more in line with the damage output of the character and their companion. We might need to reduce its damage as well, even after removing legendary actions.
Handling Save-Or-Suck Effects
Save or suck effects are effects that severely debilitate or remove combatants from combat. Spells such as dominate monster, sleep, or hypnotic pattern all count as save-or-suck abilities (some, like sleep, don't even give you a save). Monster effects like a banshee's wail, a vampire's charm, or about half of a beholder's eye rays all count as "save-or-suck" abilities.
These abilities may remove the threat of a single character in a group when a group of characters face a monster but in a one-on-one game, they may completely remove the threat of the entire party all at once.
We have to be particularly careful running monsters who have save-or-suck abilities against the characters in a one-on-one game. We can simply remove these abilities, focusing on actions that inflict damage or create less debilitating effects. We might slightly modify these abilities to account for their potential danger. We can, for example, remove debilitating effects after a single round instead of requiring a saving throw. Above all we need to be aware of the problem before it becomes one.
Such effects may steer the story in an interesting direction, however. A character charmed by a vampire might take the story in a totally different direction. This shift in the story may make for great entertainment but it could ruin a game if a player's solo character gets killed by a bad save against a single beholder eye ray.
Keep an eye out for save-or-suck effects and adjudicate them understanding that they were likely intended for a party of four, not a party of one.
Adding Relics, Scrolls, and Potions
A single character in a D&D game is likely to have major mechanical deficiencies when compared to a full group. Fighters, for example, may not have any good way to handle a larger number of smaller monsters. The companion character is intended to off-set these deficiencies but that only goes so far. We may need other ways to shore up these deficiencies.
Healing is an obvious potential gap. If, for some reason, neither the character nor their companion have a magical way to heal; we'll want to add in a good number of healing potions and other potential magic items to offset this.
Area-of-effect spells may be a problem as well. A single fighter and a cleric might be good facing a smaller number of foes but fireball might be a big help that they're not going to ever get. A necklace of fireballs is a great magic item for a fighter to help offset their lack of area-of-effect spells.
We can drop in lots of relics into our games to give more utility to the character and their companion. We can choose some of these randomly or we can select a few that we think help off-set the mechanical gaps the character may have when facing a world that expects a mix of four such characters.
Handling Big Battles Off-Screen
Earlier we talked about running a single character through a big campaign adventure like Tyranny of Dragons. What would it be like for a single character and a sidekick to face Tiamat? First off, we'll remove Tiamat's legendary actions and legendary resistances. We'll move her breath weapon from a legendary action to a normal action. It wouldn't make sense that she can't breathe.
We might give our characters some handy ways to deal with those breath weapons through various potions of resistance or other relics that might help offset her devastating power.
We can probably tweak her stat block in other ways, selectively forgetting about her regeneration and divine word ability. She still has a boatload of hit points and a high AC.
When we have a foe like this, we might consider running some of the battle off-screen. Perhaps the alliance of metallic dragons fighting against Tiamat has already faced her, cutting down her hit points and maybe even disabling a couple of her heads before the character gets involved. Perhaps a group of allied archmages has blasted the queen of dragons, disrupting her regenerating before being incinerated by her dragon's breath, which has yet to recharge.
When we see the story heading towards an area where a single character and sidekick simply can't stand up to a larger foe or force, we can move some of the situation off-screen. If the characters, for example, find themselves about to face forty orcs, we might have a force of allies take on the bulk of these orcs while our hero and their sidekick face the orc leader and her two henchmen. This gives us the feeling of the larger battle without worrying about our character being overwhelmed.
Expanding the World of D&D
Being able to run D&D with just a single player and a single DM dramatically expands our ability to play D&D. It brings D&D to entire groups of people who would otherwise not be able to get four to six of their friends together at any given time. Being able to run D&D one-on-one while still running the hardcover D&D adventures means we can share epic tales of high adventure in which heroes face tremendous world-ending foes. With a handful of simple tricks to tune such adventures we can share tales of high adventure with just a single DM and a single player.
Here at Sly Flourish I believe firmly in helping DMs develop the tools change up our game without having to spend a lot of time or carry around a lot of extra books. This means learning how to do a lot of the prep and improvisation work of D&D in our heads. For example, my encounter building guidelines are intended to give DMs some rules of thumb to quickly gauge whether an encounter might be inadvertently deadly.
We have other tricks we can use to improvise the challenge of a combat encounter without resorting to any charts, tables, tools, or anything else. We can increase or reduce a monster's hit points, damage, or the number of monsters in a battle to easily change the threat of the battle. We can do all of these while a battle is taking place. If this feels like cheating to you, consider hanging onto the game with a looser grip. As long as your drive is to make the game as exciting as you can, you have full authority to make these sorts of changes.
We have other simple tools we can keep in our heads that help us run a fun D&D game. We can grant advantage or impose disadvantage as we improvise the situations, actions, motivations, backgrounds, and specialties of the characters. "Bless, roll an Intelligence (Religion) check to see if you recognize some of the symbols on this altar. Roll with advantage because the voice of the planetar in your sun blade whispers ancient secrets to you,".
Improvising difficulty classes (DCs) is probably the most-used and easily-implemented improvisation techniques in D&D. If there is a reasonable chance for failure in any situation, choose a difficulty based on the situation on a number between 10 (moderately easy) and 20 (really hard). That's the challenge the characters must beat.
Image may be NSFW. Clik here to view.
Improvising Legendary Monsters
Now we come to the subject of this article; building legendary monsters the lazy way. Much of the time we can use an existing legendary monster from the Monster Manual. Probably 19 times out of 20, this suits us just fine. Sometimes, however, we want to take a normal monster and make it a legendary one. Let's take the Avatar of Sekolah for example. The Avatar is a giant two-headed shark summoned by the priestesses of the sahuagin. There's actually a stat block for this shark in Ghosts of Saltmarsh but I wanted something more straight forward and dangerous.
We start with the giant shark stat block in the Monster Manual. The first thing we can do to make this thing legendary is to increase its hit points—200 sounds good. Again, no need to write anything down. We just keep this in mind. Now we get on to the legendary parts. First, we give it three legendary actions. These might be used for an additional attack, a move, or some other activity that makes sense. In the case of the Avatar of Sekolah, we'll give it an extra bite attack as part of its attack action to account for its second head (oh yeah, it has two heads). We can also give it an extra bite attack for the cost of two legendary actions and a free movement without provoking attacks of opportunity as a single legendary action. This gives it some mobility and a way to threaten back-line combatants. Finally we give it three uses of legendary resistance to break out of save-or-suck abilities.
All of these things can be done in our head. We don't need to write them down. This lets us turn any monster into a legendary monster without having to do any real work at all.
Announcing Legendary Monsters
Because it might not be clear that the characters are about to face a legendary monster, it can help to announce to them that they are about to face a legendary foe. I like to say "you believe you are about to face a legendary foe" while wiggling my eyebrows. This gives the players some opportunity to shift their tactics and they won't be too unpleasantly surprised to find their save-or-suck spells getting ignored and the monster they're facing hitting them between turns. Some DMs believe this information should be held behind the screen. I don't mind revealing it and I've never seen it detract from the fun of the game.
When in doubt, lean towards revealing too much.
Don't Overdo It
Just because we have easy tools to build legendary monsters doesn't mean we should use it often. Legendary monsters are truly special beings. A legendary monster is more than just a stronger variant of an existing monster, it's a unique variant. If we want a stronger monster, more hit points, more attacks, and more damage will often do the trick without giving them legendary actions or legendary resistances. Legendary monsters are special. Our players should never question why this creature is legendary. One mere look at it and the story surrounding it should be enough to mark its legendary stature.
Worry Less About Challenge Ratings
One argument about building such legendary foes is that these changes increase the challenge rating of the creature and we don't know how far. My simple response is "It doesn't matter". Challenge ratings are a loose guideline at best. What we know of the capabilities of the characters matters much more. Given that we're taking a single creature and making it legendary means we're likely only running that one creature. This puts it at a distinct disadvantage against four to six characters already. It's challenge rating may be two or three higher than the original but really, who's counting? If you double the hit points of a creature and give it legendary actions and resistances, you can probably count it as two or three copies of the base creature.
Better yet, don't get hung up on the math; it doesn't work that well anyway.
Building a D&D Toolbox We Keep in Our Heads
The best tools in D&D are the ones we have in front of us. Even better are those we need not have on hand at all but can keep in our heads. The ability to build legendary monsters without having to write a single thing down is a powerful tool in our toolbox. We can turn any creature into a creature of legend—a creature whose name will be recorded in ancient texts and fantastic stories. Keep these guidelines in mind when you wish to build your own legendary foe.
Like those articles, this article contains spoilers for Ghosts of Saltmarsh.
Image may be NSFW. Clik here to view.
The End of a Trilogy
The Final Enemy is the last adventure of the trilogy focused on the sahuagin threat which began in The Sinister Secret of Saltmarsh and continued on in Danger at Dunwater. In The Final Enemy the characters travel to the former lizardfolk island, assess the threat of the sahuagin, and perhaps end the threat the sahuagin hold over Saltmarsh before their attack begins.
Like the other two adventures in this series, The Final Enemy is an excellent sandbox adventure in which we lay out the situation and the goals and the characters are left to their own devices to succeed in that goal. How they choose to approach the sahuagin-invaded island will dictate how the sahuagin react. This is perfect situational D&D. We put the situation out in front of the players and we figure out how that situation changes as they interact with it. We may be as surprised as the players how things turn out. It's a wonderful way to play D&D.
Clarify the Goals
Because this adventure is so open-ended, it's important to clarify the adventure's goals to the players. You don't want a situation in which they're deep in the lair and then turn to one another and say "why are we here again?".
We can simplify the goals down to the following, which are clarified well in the adventure under "mission goals". I'm adding one of my own which I think is important for the rest of the adventure.
Determine the size and strength of the sahuagin force.
Find important locations within the fortress.
Identify defenses.
Identify the sahuagin leadership (this one I added).
It's possible the characters may find a way to stop the sahuagin attack before it even starts by killing the leadership of the sahuagin and removing any desire from the remaining sahuagin to attack the coast. They might accomplish this by killing the baron and high priestess in area 42, killing the baroness in area 45, and killing the avatar of Sekolah in area 37.
With these heads of the sahuagin removed, the rest will gather up in small packs and flee into the ocean.
Change Up the Number and Type of Sahuagin
Depending on how the adventure is going when you're running it, feel free to change up the numbers and types of sahuagin the characters encounter. Instead of patrols of eight sahuagin, feel free to include just two normal sahuagin wandering through the caves (see two thugs in the woods. Mixing up the number of sahuagin can change up the pace and feeling of the game. Too many battles against six to twelve powerful sahuagin can get boring and stale. Changing up the situations so that the characters can use stealth, subterfuge, intimidation, or deception to get past them as well as combat can make the adventure a lot more interesting.
Returning to Saltmarsh
Given that the characters may not end the threat their first time through the sahuagin fortress, you'll have to figure out what happens when the characters leave and the threat remains. One possibility is that, discovering the infiltration, the sahuagin launch an attack against Saltmarsh. They may send in three killer whales each mounted by a sahuagin waveshaper and protected by a small force of sahuagin on shell sharks. These waveshapers slam the coast of Saltmarsh with huge waves that destroy ships and hammer the coast. The characters can deal with a number of situations during this attack such as a coastal sahuagin flanking attack, drowning sailors in the sea, collapsing buildings, or attacking the waveshapers themselves. This can be a fun large battle the characters can get involved in. We need not make this complicated. Describe the larger battle going on while the characters deal with their specific battles or situations.
During this attack the characters may have a chance to eliminate heads of the sahuagin threat and leave a much reduced force back at the sahuagin fortress. When they return to the fortress they can hunt down the remaining heads of the sahuagin and end the threat completely.
Tying Into a Larger Story
One unanswered question in this adventure is how to tie it together with the other adventures in Ghosts of Saltmarsh. We may connect the sahuagin to the Endless Nadir described in The Styes. The sahuagin may have fled from the ancient aboleth city as a rift tore open into the lower layers of the abyss. The characters may learn this from the sahuagin themselves, from murals on the wall, or perhaps an intelligent trident of fish command possessed by a marid (one with family connections to any water genasi in the group perhaps). This thread ties the sahuagin to the larger threat of an ocean poisoned by the realm of the Elder Elemental Eye.
A Great Sandbox Adventure
The Final Enemy is an excellent sandbox adventure in which the characters choose their approach to assess and perhaps destroy the threat of the sahuagin against Saltmarsh. Stay flexible with the encounters they face and let the story play out as the characters delve deep into this dangerous lair.
Your most important Dungeons & Dragons game is the next one you're going to run.
This might be blindingly obvious or it might be completely alien to you. We DMs have big dreams. We have big plans. We plan out entire 1 to 20 campaigns before we've had our session zero. We love to build out campaign worlds for years before our characters step outside of their single town. We think about future boss monsters. We think about future combat encounters. We think about big twists that may take place in the story.
None of that really matters. It's all ethereal until it hits the table. Your future four-year campaign doesn't exist until its over.
All that matters is your next game.
Return of the Lazy Dungeon Master spends a lot of time on individual game preparation for this reason. It's useful to think about the big truths in a campaign world. It's fun to think about the villains, where they're going, and what they're doing. We like to be able to describe a campaign with a clear elevator pitch. But, in Return of the Lazy Dungeon Master we don't spend a lot of time on building large campaign arcs because, deep down, they don't matter. Only the next game matters. The results for each eight steps matter.
How are we going to make our next game the best game we can? What can we stick into it that will really blow the players away? Who are the characters? What is our strong start? What scenes might occur? What secrets will they uncover? What locations will they explore? Who will they meet? What monsters will they face? What treasure might they uncover? That's what we should focus on.
What can we do to make our next game awesome? Is it handouts? Is it a cool location map? Is it some evocative 3D terrain? Is it a character's hook we can finally reel in?
Our DM's mind wanders. When we're given permission to build entire universes in our head, it's hard not to let our minds rush outward. We can build planet-sized dungeons. We can establish histories that go back millions of years. We can build entire pantheons of gods. How can we not give our minds the freedom to do so?
We can, but not at the expense of our game. None of those things become real until they play out at our game and things only really play out in the next session we run. Until then, nothing else matters. Nothing else exists.
The more we detail future adventures our minds, the more we might lose sight of what comes next. If we're ever struggling to know what to do, how to prepare, and how to fit it such preparation into our busy lives, it is freeing to recognize that the only game we need to worry about is the next one we're going to run.
I'm a huge fan of serials. Shows like True Detective put a limit on the overall story but give that story enough room to breathe and fill out across many episodes. The game Shadow of the Demon Lord by Robert Schwalb builds itself around this episodic structure as the core of the game. Characters are intended to level each session across eleven sessions that make up an entire Shadow of the Demon Lord campaign. This builds a strict structure around the campaign. Some may find it too restrictive but others, like myself, enjoy having this fixed structure to build around.
Image may be NSFW. Clik here to view.
We can take this same episodic approach with our Dungeons & Dragons games. Often, when running large hardback adventures, we let the game go however it goes. It begins where it left off previously and it ends wherever it ends as time allows. This can be a fine and relaxing way to play, one that doesn't push a lot of adventure time management onto the DM's already long list of required activities. When running a campaign adventure like Tomb of Annihilation, we can let it go as long as it needs to go.
There can be some fun in building a more focused episodic structure to our campaigns, one in which the each session has a clear beginning, middle, and end. Such a campaign might have a fixed number of "episodes" until the end of the campaign. It works well if you know that your group has a limited number of sessions already. It also works well if your game is somewhat irregular but each session is still long enough to fit in a whole adventure. Four hours is a good benchmark.
Planning Out the Serial Campaign
When following the concepts in Return of the Lazy Dungeon Master we focus our attention on the next session and have, at best, a loose outline for the rest of a campaign. This works well if we have no real time limits on each session or on the campaign as a whole. When we're running a focused episodic campaign, like an eleven-session Shadow of the Demon Lord campaign, we'll need more structure than that.
It doesn't have to be much more structure, however. If we look at the level 1 to 20 gnoll campaign outline we only need a one-line description for each session beyond the next one and a general idea how the story is going to go. We still focus our attention on the next game but we have a more fixed and focused outline to work from.
Here's an example for my Shadow of the Demon Lord game but it can work just as easily for a D&D game. The overall goal of this campaign is to stop the coming of the Demon Lord by destroying the four anchors that pull him into the world. Each anchor is an object or being of great power and requires a single item to destroy it (known as a "breaker"). Here's the eleven session campaign outline:
Rescue Father Gregory from the Black Vault beneath Crossings
"Rescue" Candace Dreen from the thugs who kidnapped her (turns out she's a demon).
Break into the Dreen mansion to recover notes from the demonologist Moore.
Recover the first Breaker: the Sword of Stars
Recover the second Breaker: the Shard of Night
Recover the third Breaker: the Blackfire Wand
Recover the fourth Breaker: the Bone of the Innocent
Destroy the first Anchor: the Demon Prince
Destroy the second Anchor: the White Princess
Destroy the third Anchor: the Black Sun Manuscript
Destroy the fourth Anchor: The Eye of the Demon Lord
You can see the clear structure of this campaign. Because it breaks out into two groups of four objectives, the characters can accomplish each of these four objectives in whatever order they want. I only flesh out these individual adventures when I'm getting ready to run the session. It's enough to have the outline to work off of and know I have a clear direction for the campaign.
Sometimes it behooves us to expose this structure to the players. In the outline above, the players learned the general structure for the campaign in session three. They know they'll need to recover four breakers to destroy four anchors. They know each session will cover one of these events. They'll be as committed as we are to follow the structure of the campaign.
Maybe our campaign doesn't actually end up this way and the outline changes. That's ok. Sometimes the best stories take a hard left turn and become something very different. We can be cool with that and it might actually end up being a better game. It still has to fit within the structure, however, so when that hard left turn happens, it's time to rebuild the outline and not let the story get out of hand.
Building In Flexibility
Because each adventure is intended to fit within a game session and because adventures have a tendency to go off the rails we have to build in a fair bit of flexibility into them. We may have to dramatically shorten our adventure or pad it out to fit within the session depending on how things go. Most of the time we'll need to shorten it up. It's rare when we don't have enough material to fill out a session and much more likely that we have too much.
Our first goal is to have the end in mind always. We need to know what the final conclusion of the adventure will be and be prepared to push the adventure to that conclusion as fast as possible if needed. If we're running an adventure based on the rescue of Father Gregory from the Black Vault, we have to be ready to get the characters to the Black Vault, find Father Gregory, and face the harvester that's carving him up within the last 30 to 45 minutes of the game. We can use our tricks to time and pace each adventure with moving keys and moving MacGuffins.
Managing time becomes crucial in such short episodic adventures so we need to be thinking about that conclusion every thirty minutes ensuring that its headed towards that conclusion quickly. Clues become much easier to discover later in a game. Dungeons become smaller. Piles of monsters in the way suddenly disappear. The very next room the characters enter just so happens to be the Black Vault.
There are a few ways we can build in this flexibility into our games. Here are two:
First, we can shrink the dungeon. If we're using a map for our dungeon, say the catacombs map from the Lazy DM's Workbook, we can collapse hallways and cut off rooms until a twelve-room dungeon becomes a five-room dungeon.
Second, we can cut encounters. Scenes, particularly combat scenes, all take up a lot of time in our games. When we're building out our single-session adventure we can build-in flexibility by being ready to cut scenes when we need. Maybe those wights never burst out of the sarcophagi as the characters make their way to the dead general's crypt. Maybe instead of having to negotiate with a ghost to get into the lower tomb, the characters learn some interesting lore from a fresco on the wall and find the door already open. We always want enough encounters to fill out the game but we should be ready to cut whatever we need to cut to get to the ending on time.
Character Montages Between Sessions
Because each of our games is a self-contained story, we can throw in some downtime in between each session. At the beginning of each session we can go around the table and ask what each character has been up to for this period of downtime. We can shrink or extend this downtime as it fits the story. Maybe it's only one day. Maybe it's a tenday. Maybe it's a month. A lot of interesting things can happen to the characters in this downtime and some of it may move the story into new and interesting directions. Players can have clear ideas of what their character did and learned during the downtime which is a great way to drop in some secrets and clues. Other players might not have anything particular in mind so maybe they roll on the carousing table from Xanathar's Guide to Everything. Let your players know that you'll be asking about their downtime and they may come up with some interesting ideas between sessions. This is a fun way to play D&D away from the table as well as on it.
Leveling Every Session
In an episode of the DM's Deep Dive, Mike Mearls mentioned that he felt that characters typically leveled too slowly. He went so far as to recommend leveling characters every session to see how it felt. Many DMs didn't like that idea, often describing that they felt players wouldn't have enough time to understand their characters' new abilities.
A short-run episodic campaign, however, might be just the time to try out faster leveling. Experienced players won't have much trouble understanding the new abilities of their characters and as long as as each episode happens close to the others, say weekly, players will watch their characters grow level by level each session.
A six-session, ten-session, or even twenty-session episodic campaign might be just the way to enjoy the feeling of a full D&D campaign without having to play for two years to complete it.
One Alternative Style of Play
Episodic D&D games isn't a new wonderful way to play D&D. It is one possible way we can run our games when the story and situation is right. I very much enjoyed my eleven episode Shadow of the Demon Lord game but it isn't likely to be my preferred style. The relaxed nature of an ongoing campaign means I don't have to worry about tying up every loose end at the end of a session. I don't have to have an eleven-episode outline for the whole campaign. I can run multiple villains, multiple stories, and multiple hooks and see where the characters want to go.
If you see a short focused campaign in your future, however, the episodic campaign may be just the fit. Add it to your DMing toolkit.
Many agree that the best way to get started in D&D is with the D&D Starter Set. With a low price, excellent adventure, and all the materials you need to run a game in a single box; it's hard to recommend anything else. I still consider the Starter Set adventure, Lost Mine of Phandelver, one of the best D&D adventures with its clear focus on the small town of Phandalin and a nice sandbox full of places to explore, people to meet, and threats to face.
The recently released D&D Essentials Kit adds another alternative. Like the Starter Set, it's designed for new players although not necessarily new DMs. It comes with a wider range of materials including a larger set of dice, a deck of cards, full-color maps, character creation rules, and sidekick rules. Like the Starter Set, the Essentials Kit is a bargain for the price.
But which boxed set should you get if you're new to D&D?
I'd still start with the Starter Set. It's slightly cheaper and, in my opinion, the adventures are better tuned for the characters.
But as an alternative, why not both?
The D&D Starter Set and the D&D Essentials Kit work really well together. In this article we'll look at how to join up these two products to get the best out of both.
Image may be NSFW. Clik here to view.
A Central Story with a Host of Sidequests
When combining the storylines of Lost Mine of Phandelver and Dragon of Icespire Peak we have the main storyline of Lost Mine of Phandelver and the series of individual quests from Dragon of Icespire Peak. The characters can begin with chapter 1 of Lost Mine of Phandelver, Goblin Arrows. When they arrive back at Phandalin, they find the quests from Dragon of Icespire Peak nailed to the town's quest board. The characters (and players) are free to continue following the main quest line in Phandelver or choose one of the job board quests from Icespire as they wish.
While the characters follow one path or the other, we can drop in secrets and clues that point to other quests from both Phandelver and Icespire. They may learn of the secret plot of the Black Spider while spending time on the dwarven excavation or meeting the gnomes of Gnomengarde. They may hear of the displaced orcs and the rise of the anchorites of Talos in Neverwinter Wood while exploring Thundertree or Cragmaw Castle in Phandelver. The green dragon in Thundertree may be a rival of the white dragon in Icespire Keep. The cult of the dragon in Thundertree may be recruiting both of these dragons. There's lots of ways to join up these two adventures and running them together gives the players a huge range of options to choose their path.
Not So Lazy Work
Joining these two adventures together will not make a DM's life easier. You'll need to read both adventures to get ideas how to join the two together. You'll need to bring in hooks from both adventures into the paths of the characters as they explore each of them. There will be a lot of moving parts; parts that make the world feel rich and full and real, but all of those moving parts will make your campaign more complicated. In the end, however, it can be well worth the effort.
One concern is how we handle leveling. You may want to level more slowly than you might otherwise if the characters are spending a lot of time on side quests. Otherwise the characters will out-level the quests in both adventures before either of them are done. You'll still want to level out of 1st level quickly but once you're at second level, leveling every couple of adventures is probably just fine. As an alternative you can level up as fast as you like and simply let some of the quests become obsolete before the characters have had a chance to engage with them.
Joining the Toolkits
Both the D&D Starter Set and the Essentials Kit include more than just the two adventures. The pregenerated characters from the Starter Set, which you can download right here, make it easy for new players to get into the game if they don't have the experience to make a new character. For players interested in building characters, the Essentials Kit includes all of the rules needed to create characters with the four basic races and five classes including a couple of different class builds for each class.
The two books together also include a large menagerie of monsters. Only a few monsters are replicated across both boxes. Together they provide a huge range of monsters from 1st to 5th level that you can use to run your own adventures for years without buying another book. The Starter Set has a wider selection of more basic monsters while the Essentials Kit fills out this list with stranger monsters like ochre jellies, wererats, and evil half-orc shapeshifting druids.
Both books also include a wonderful selection of maps and locations you can reskin to fit your own homebrew adventures.
The maps, DM screen, and cards from the Essentials Kit work just as well when running the Starter Set material.
Running Lost Mine of Phandelver One-on-One
One fabulous feature of the D&D Essentials Kit are the rules that let you play D&D with one DM and one player using sidekicks. Sidekicks are stripped down NPCs that run alongside player characters to shore up any deficiencies and help even out the odds in combat.
Though Lost Mine of Phandelver doesn't include any rules for scaling combat for less than four characters, we can use some handy guidelines to help us tune down battles when running Phandelver one-on-one. Here's a quick reference:
Reduce the number of monsters the character faces. Be careful when including more monsters than the number of characters.
Reduce the hit points of monsters as needed.
Reduce the number of attacks and damage of monsters as needed.
Give the character relics, scrolls, potions, and magic items to off-set their gaps.
Be wary of monster spells or effects that can, with a single stroke, remove the character from combat.
Being able to run these adventures with a single DM and single player adds a tremendous amount of flexibility. Joining Essentials sidekicks with the Starter Set is a powerful combination.
Continuing On Beyond the Boxes
When your players have completed the adventures in both boxes, you can move on to the additional digital adventures included with your purchase of the Essentials Kit. These adventures include Storm Lord's Wrath, Sleeping Dragon's Wake, and Divine Contention, all of which you can find here which take characters from 6th to 13th level. That's quite a campaign!
Building an Expanded Campaign around Phandalin
Joining the D&D Starter Set and Essentials Kit together helps you build out Phandalin in a way that neither boxed set does on their own. The world becomes richer, the options wider and more varied. The two boxes together create a powerful toolkit for DMs who want to run their own low-level adventures. Without needing another product you can run adventures using these two boxed sets for years to come.
When I think about D&D game prep, often I think about how to streamline it and reduce it to the elements that bring the best value to our game. This is the core idea behind Return of the Lazy Dungeon Master. How can you get more out of your game by preparing less?
In Return we boil down game preparation into eight optional steps including the following:
Review the characters
Create a strong start
Outline potential scenes
Define secrets and clues
Develop fantastic locations
Outline important NPCs
Choose relevant monsters
Select magic item rewards
You don't have to use the steps if they aren't needed. We talked before about choosing the right steps given various gaming situations. We can reduce this checklist when we let other products, like published adventures, do some of the heavy lifting for us.
All of this is to help streamline game prep. We're all busy. We all have a lot of demands on our time. We don't often have more than 30 minutes to an hour to prepare for our D&D game.
But what if we did?
What if we had a full day to prepare for our D&D game? What if, on one magical day, we had no other commitments. We had no other demands on our time. And, on this ideal day, what if we managed to avoid the temptations to spend our time on video games, TV, movies, or the internet?
If we were able to spend a whole day preparing for our D&D game, where would we spend it?
Image may be NSFW. Clik here to view.
Why This Matters
This feels like an unrealistic question to ask and some might not understand why it's valuable at all to ask it.
It matters because it helps us take a step back from the continual refinement of game prep that boils it down to 30 minutes and lets us ask ourselves what else might matter. If we had the time, what else might we bring to the game that can make a big difference?
This new angle on game prep—what if we had a full day uninterrupted to prepare for D&D—helps us look at the whole topic in a new way. We don't know what we'll find there. What other useful D&D prep activities might we discover? That's why it matters.
Twitter's Responses
I asked the question on Twitter to see what other people thought. My first take on the question ("What would you do if you had a whole day to prep your D&D game?") came back with almost all joke replies. Play video games, procrastinate, panic, etc. A more refined version of the question ("Ideally, what would you want to do if you had a full day to prep your D&D game?") came back with much better responses. I received about 220 replies which I stuck through some text processing to see what common topics came up. Here were the answers:
map (70), npc (51), player (47), encounter (41), prep (36), character (29), note (27), prop (22), music (21), monster (19), mini (18), handout (18), plot (17), world (17), campaign (16), story (16), adventure (16), pc (14), draw (12), combat (11), terrain (10), location (10), background (8), read (8), puzzle (8), hook (8)
The most common single response was working on maps, which I thought was interesting. NPCs, encounters, characters, all were high on the list too. Props, music, handouts, terrain, puzzles; all great ideas. If we had the time, we know where we might put it.
Mike's Day of D&D Prep
On a particular Sunday, when I might otherwise be busy writing D&D stuff or running my regular D&D game, I found myself with this hypothetical day in reality. My game got canceled. My other commitments were taken care of. I had a full day with nothing on the agenda that I had to do. I could have easily filled it up with things, but this was the perfect chance to actually see what it would be like to spend a whole day on a D&D game.
It also came at a very good time. I had just finished up two campaigns and a bunch of Ruins of the Grendleroot playtests and both of my groups were about to start Ghosts of Saltmarsh. There seemed like no better time to spend a day preparing for D&D like at the beginning of a pair of new D&D campaigns. So I cleared off the rest of the schedule and wrote out a checklist. On Sunday, I began my day of D&D prep for Ghosts of Saltmarsh.
Other than taking an hour to talk about my full day of D&D prep on my Twitch show and spending some time wiring some power cables under my gaming table, I spent the whole day doing stuff related to Ghosts of Saltmarsh.
Here was the checklist I followed:
Prepare maps
Read the adventure
Read the appendices
Consider character backgrounds & hooks to each adventure
Review and make handouts
Collect miniatures for next few sessions
Ponder NPCs and their actions
Build a campaign soundtrack
Get a prop lantern
So how did it work out? Not so bad and I did learn a few things. Some of the things on the checklist I never got around to. I never got a prop lantern. I stuck to the Assassin's Creed Black Flag soundtrack for my campaign soundtrack but never actually used it. I only picked out miniatures for the first full adventure but they're were all nice and organized.
Printing Maps (two hours)
One of the biggest things I did during the day was get all of the Ghosts of Saltmarsh maps printed at Staples using their blueprint printing service. I was able to get about fourteen maps for $50. Some of them are obnoxiously huge, 36" by 48" and still only cost $7.50. If I had to do it again I wouldn't get any map bigger than 24" x 36" which ran about $3.75. I'd also print the 10 foot per square maps using 18" x 24" because they aren't battlemap scale anyway and the smaller format is easier to handle on a table. 18" x 24" maps ran under two bucks a piece; an amazing deal.
Getting all of the files off of D&D Beyond and into the Staples print center web page took about an hour and driving there and back took another hour. So that was a good piece of time spent on something that my players will definitely notice.
In the end, though, I barely used these maps. I tended to use them for the first couple of adventures but by the time I ran the Final Enemy, I stopped using them. I was customizing the dungeons too much to bother with a large fixed map. While blueprint mapping worked great, particularly for Dysonlogo maps, I don't know that I'd bother with it again. I can just draw them out on a dry-erase map when I want them.
Reading the Adventure with the Characters in Mind (three hours)
I think the most valuable thing we can do when we have a lot of time is to read the adventure we're running (assuming we're running a published adventure) while thinking about how we can tie the characters into those adventures. This means spending time reading over our characters' backgrounds and then reading through the adventure thoroughly to see how those backgrounds can tie back in. While we read it we can jot down some possible character connections. Here are some examples:
Huron the water genasi served aboard the Emperor of the Waves. He was thrown overboard and awoke amidst the ship's ruins.
Umber the sea elf fighter was on a ship in which Lowrin Solmor, father of Anders Solmor, was killed. He is still very loyal to the Solmor family.
Jamras the triton warlock has been hunting for a dark power supposedly rising in the south. He has a coin with a swirling pattern on it that means something important.
One of the characters will know that the Sea Prince Syrgaul sailed on a warship called the Tammeraut. The Tammeraut was sunk ten years ago.
The water dwelling members of the party know about a rift in the sea floor that none of the aquatic races will go near known as the Endless Nadir.
These interconnections between the characters and the adventures can have a strong impact in the game. When the players see why their characters would get involved in an adventure they have a much stronger connection with the story than if their characters is essentially running independently from the plotline.
Gathering Miniatures (one hour)
These days I'm much more of a theater of the mind DM. I'll occasionally ask a player to grab one of my miniature boxes and fish out some minis for a fight but I find that the flexibility of theater-of-the-mind combat frees up the story to go in any direction it wants to go.
My players still love miniatures, though, so spending some time to grab up all of the potential miniatures I'd need to run the first chapter of Saltmarsh seemed like a good use of time. That took about an hour. That includes digging out multiple miniatures for each of the characters so the players can choose the one they like.
Ideal Preparation List
If time weren't a factor, where might we spend the time? Given my own experiences, here's the list I'd choose:
The Eight Steps. Going through the eight steps from Return of the Lazy Dungeon Master is still the most useful way to spend time that I can offer. With more time available we can expand some of these steps out into longer activities. We can expand out on our character reviews, NPC development, and secrets and clues. We can dig deep into our villains, their goals, and the things they'll do to reach those goals. We can map out potential treasure rewards for each of the characters over the course of a campaign. We can take each of the eight steps that apply to the type of game we're running and expand on them as much as we wish.
Handouts. Great handouts bring the players into the story of the game. It's one thing to describe a letter one of the characters finds. It's something else to hold that letter in your hand. Great handouts take time. We need to write them and edit them down so they're the kind of thing our players will actually read. Secret maps, clues to puzzles, cyphers between villains; great handouts hit new senses and wake up new parts of the brains of our players. Printing out notes on copper resume paper with cool fantasy fonts is an easy way to make a handout look great. Making handouts takes time but if we happen to have the time, they're worth it.
Maps. Who am I to argue with all of the Twitter responses talking about preparing maps? Maybe this means gathering a bunch of Dyson maps and printing them out using the Staples blueprint print center or maybe it means drawing maps. Maps help bring players into the world. They help make the world more real. That's a valuable use of time.
Miniatures. Finding the right miniatures and preparing them ahead of time can also make a nice difference. It's one thing to describe a monster and show a picture of it in the Monster Manual and something else to drop the right miniature on the table. For most people, getting the right miniature can be too costly, regardless of time. Printing out paper miniatures or digging up artwork and building tokens is more cost effective, though still requires some time. Buying and painting miniatures to represent the characters takes time but is a worthwhile activity given how long those minis will sit on the table. Using painted miniatures for player characters and tokens for monsters is a good cost-effective mix.
Terrain. I'm a huge fan of Dwarven Forge. When the situation calls for it, building out cool Dwarven Forge layouts makes the game world even more solid. As cool as it is, building out wonderful 3d dioramas won't make as much of a difference as spending time thinking about the characters and how to better integrate them into the story but if one has the means and the time, they definitely make a great game even better.
Music. I like to have some background music going while I run my games. Instead of spending a lot of time on specific tracks and playlists, I set up three general playlists: D&D Relaxed, D&D Sinister, and D&D Combat. I pick songs from a variety of video game soundtracks including Darkest Dungeon, the Witcher 3, Skyrim, Horizon Zero Dawn, Divinity Original Sin 2, and various Assassin's Creed soundtracks. I'll split the songs up among those three playlists and play them out during the game. It takes about an hour initially but one can use the same playlists for years.
The Diminishing Returns of D&D Prep
Having spent an entire day prepping for D&D I found that such time led to diminishing returns. This isn't a surprise. The whole philosophy of Return of the Lazy Dungeon Master is that less prep can lead to a better game. It was still interesting to see it in practice. I got some value out of the time I spent preparing for my Ghosts of Saltmarsh campaign but much of the value comes from spending thirty minutes on the checklist. It's worth the time to think about where our time is best spent preparing for our D&D games. We may never have a full day to prepare for our D&D game and that's just fine. Really, all we need is thirty minutes.
This article is intended for someone who is interested in Dungeons & Dragons but has no idea where to start. My intent is to get you on the right path to enjoy D&D.
If you are a veteran to D&D, consider sending this article to your friends who have not yet started playing.
Image may be NSFW. Clik here to view.
The D&D Basic Rules are the best place to start learning about D&D. This free, legal, and official PDF has enough material in it to play D&D for a long time without spending any money at all.
If you know nothing about D&D, the first few pages of the D&D Basic Rules tells you just about everything you need to know about playing D&D.
There are a lot of other great resources for D&D that cost nothing or next to nothing as well but the D&D Basic Rules are the best place to start. Within it you'll find the rules to the game, character creation rules, rules for DMs, and monsters to include in your adventures.
Watch What D&D Looks Like
If you want to get a better idea what D&D looks like in play, take a look at the following D&D liveplay videos. Many of these have high production values but they still give you a good idea what it looks like to play D&D. Each video is about two to three hours long.
You might also pick up the D&D Essentials Kit. This boxed set includes another adventure, Dragon of Icespire Peak, designed specifically for new DMs and includes rules for running D&D with just one player and one DM. If you're running this adventure, read my guide for running Dragon of Icespire Peak before you get started. The adventure has some rough spots for 1st level characters in it.
Both of these boxed sets can work well together, filling out the area around Phandalin with a host of quests and adventures the players can choose from.
Getting a Group Together
You can play D&D with as few as a single dungeon master and a single player but one DM and around four players is more common. Finding and maintaining a D&D group is likely the hardest part of running a D&D game. Read my article on finding and maintaining a D&D group for advice on finding the right players and keeping your game going week after week.
The Core Books
At this point, if you and your friends are enjoying D&D, it's time to dig into the D&D core books. There are three D&D core books: the Player's Handbook for players, and the Dungeon Master's Guide and Monster Manual for dungeon masters.
With just these three books in hand you have enough material for years of play. You don't need any other books or accessories to play D&D for the rest of your lives. Instead of physical books you also can buy books on D&D Beyond and share them with your group online.
D&D has a number of other books that add new monsters, races, class abilities, and campaign worlds. These include:
These books are entirely optional. You can go a long way with just the three core books. That said, each of the above books has additional material both in mechanics and lore to grow your game.
Wizards of the Coast also publishes a number of large campaign adventures. These big adventures can take a group over a year to complete and do a lot of the heavy lifting for you. Many DMs prefer to run their own adventures in their own world, however. You can read all about these published adventures at my guide for published D&D adventures.
A Flip Mat. Being able to draw what a location looks like can be very useful, particularly for combat. This Pathfinder Flip Mat is my personal favorite. It's cheap, lightweight, easy to pack, and limitless in its flexibility.
Tokens and Miniatures. You'll see a lot of D&D games that use miniatures for characters and monsters. Miniature collecting and painting is its own limitless hobby. Miniatures aren't required to play D&D. There are many cheap options for representing characters and monsters on the table to help you show positioning in combat. These cheap tokens represent both monsters and characters and can be put together for under $30. For more information on tokens and miniatures, see my New DM's Guide to Miniatures.
There's a huge array of other accessories for running D&D games. Some are good, many will complicate your game without making it any better. You don't need anything more than the core books and some dice to enjoy D&D for the rest of your life. Don't get overwhelmed. Start small and add in the accessories you need to make your game great.
The Beginning of Limitless Worlds
Endless adventures await you should you continue your journey into Dungeons & Dragons. Once you've gotten started, check out my Start Here page for a selection of the top articles from this site to help you along your path. Grab your walking stick, tighten up your boots, and lets explore new worlds together.